By: CS2103JAN2018-W13-B4 Since: April 2018 Licence: MIT
- 1. Introduction
- 2. Getting Started
- 3. Design
- 4. Implementation
- 5. Documentation
- 6. Testing
- 7. Dev Ops
- Appendix A: Product Scope
- Appendix B: User Stories
- Appendix C: Use Cases
- Appendix D: Non Functional Requirements
- Appendix E: Glossary
- Appendix F: Instructions for Manual Testing
1. Introduction
PrioriTask is a desktop task management application. It is not just any task management application, but a combination of a to-do list, calendar and reminder features, with the added bonus of an automatic updating and sorting of your tasks based on priority levels. It helps you keep track of your tasks, while providing you with at-a-glance views of upcoming tasks.
PrioriTask is a fairly new application that has much room for improvement. We welcome any form of contributions to PrioriTask project, be it from beginners or seasoned Java developers. Experienced or not, this guide can serve as a helpful reference and source for information for those who hope to contribute to the project.
2. Getting Started
This section contains a list of steps to help you get started with developing for PrioriTask in no time.
2.1. Installing prerequisites
Before working on PrioriTask, ensure that you have the following software installed:
-
JDK
1.8.0_60or laterPrioriTask works best on JDK 1.8.0_60or later.
It will not work with earlier versions of Java 8. -
IntelliJ IDE
PrioriTask requires Gradle and JavaFX plugins.
IntelliJ has both plugins installed by default. If you have disabled them, go toFile>Settings>Pluginsto re-enable them.
2.2. Setting up the project on your computer
Follow these steps to setup the project on your computer:
The following steps are written for IntelliJ IDEA 2017.3.5 (Ultimate Edition).There may be slight variations in the steps if using other versions of IntelliJ. |
-
Fork this repo, and clone the fork to your computer.
-
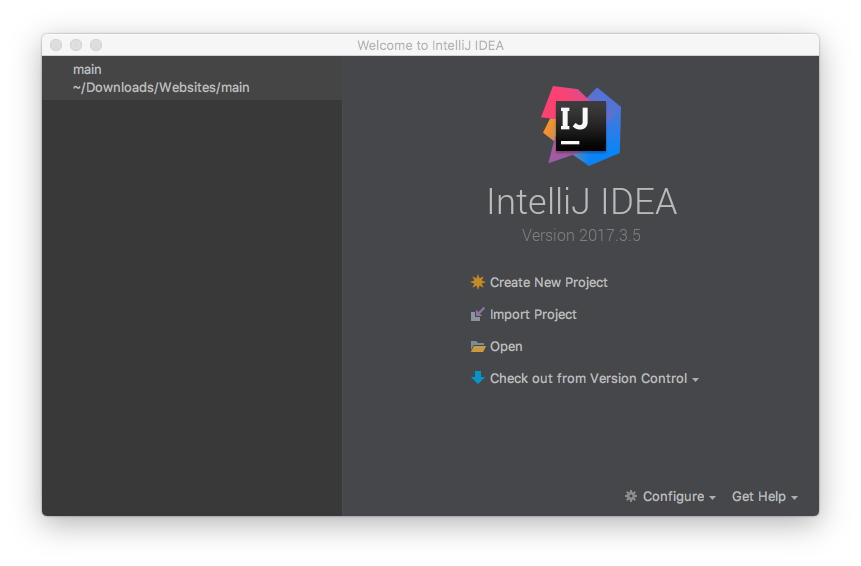
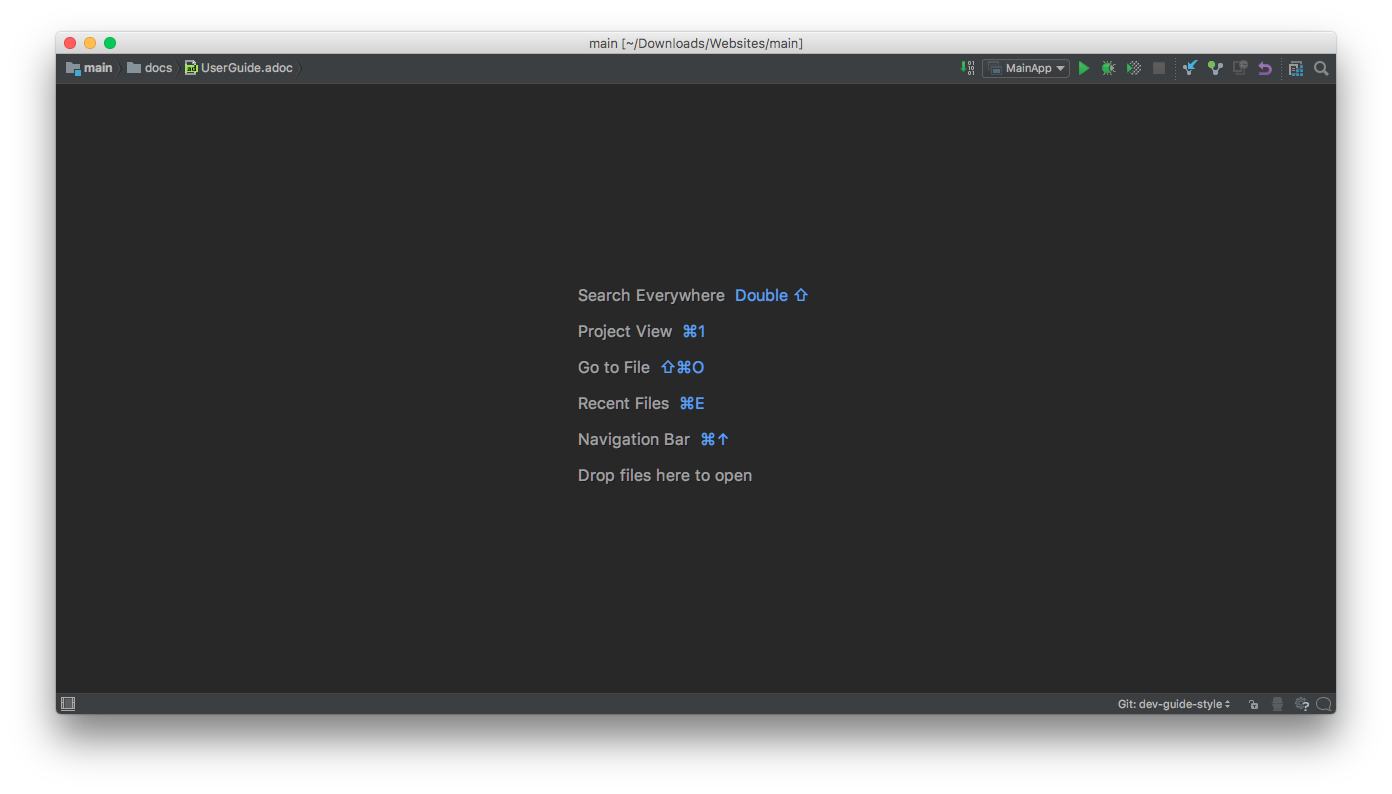
Open IntelliJ. You should see the welcome screen (refer to Figure 1, “IntelliJ’s welcome screen”).
If you do not see the welcome screen, select File>Close Projectto close the existing project dialog before continuing.
-
Click on
Import Project. -
Locate the cloned folder, and select it. Click
OK. You will be directed to theImport Projectwindow (refer to Figure 2, “The first page of theImport Projectwindow”).
Import Project window-
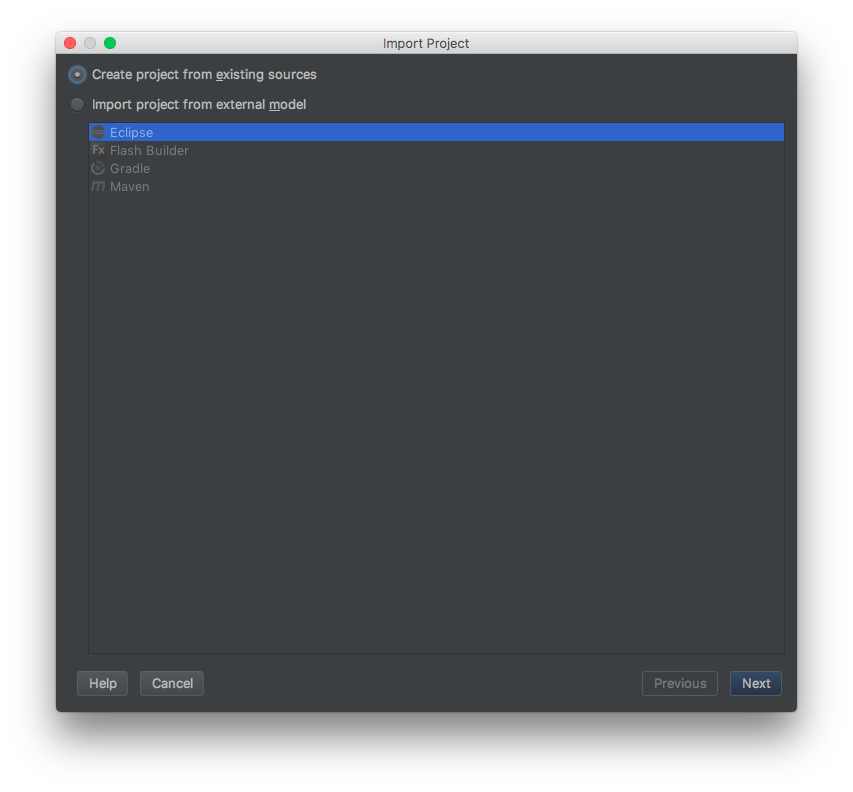
Check the
Create project from existing sourcesbox and clickNext. You will be directed to the next window (refer to Figure 3, “The second page of theImport Projectwindow”).
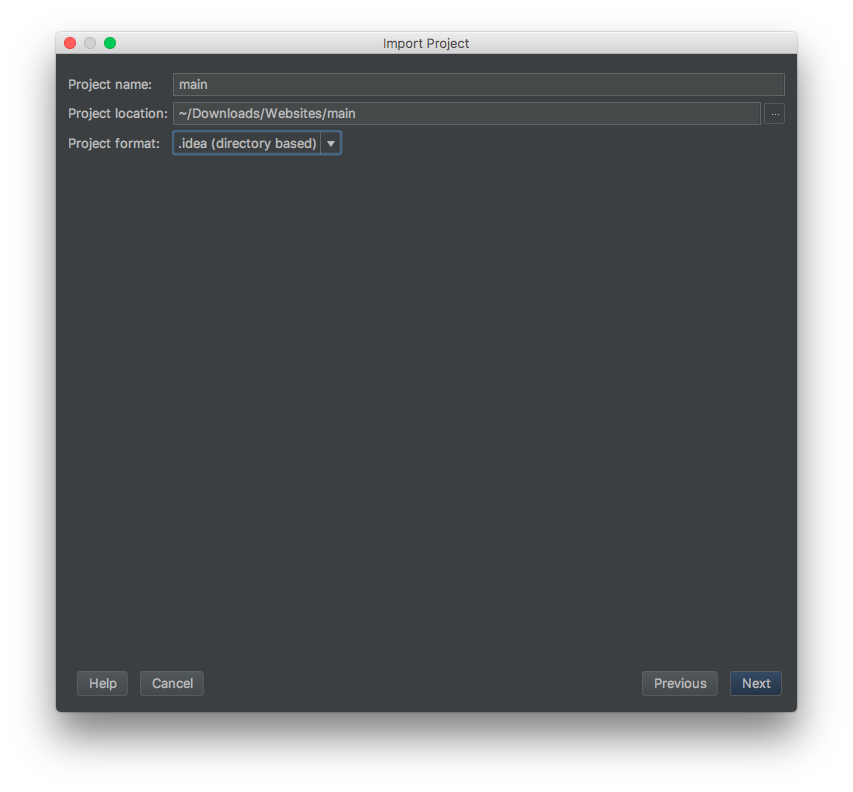
Import Project window-
Fill up the necessary information as follows, and click
Next. You will be directed to the next window. -
Click
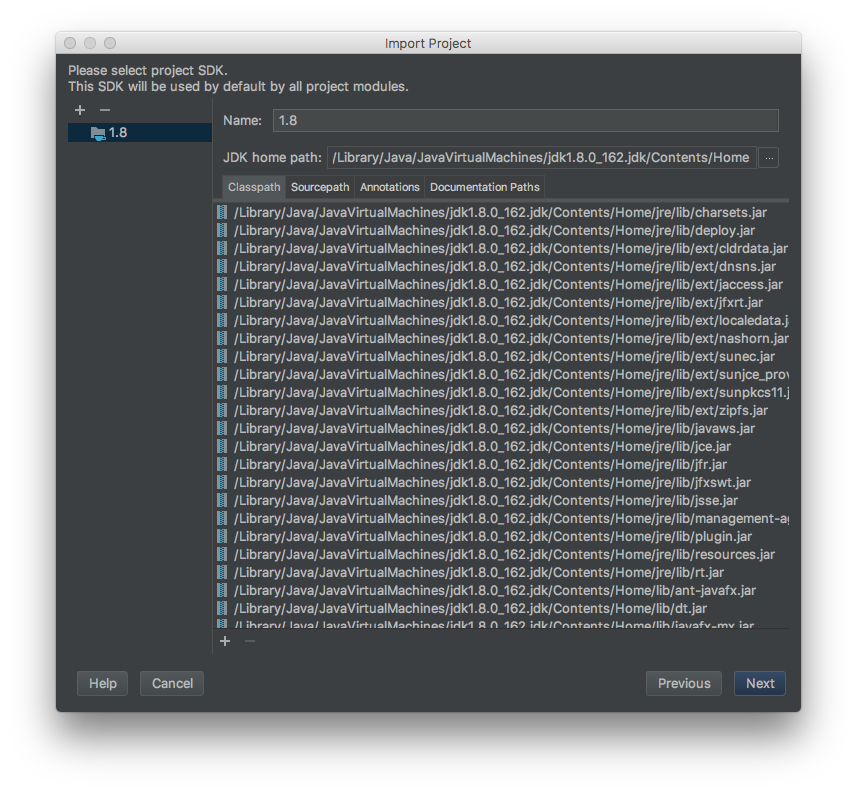
Nextrepeatedly, until the window to select the project SDK appears (refer to Figure 4, “Selecting project SDK in theImport Projectwindow”).
Import Project window-
Click on the JDK
1.8folder in the left pane and clickNext.If you do not see a JDK 1.8folder, click on+>JDK, and find the directory of the JDK. -
Click
Nextuntil you reach the last window. ClickFinishto complete the import of the project. The project will be loaded and you will be brought to the main project window (refer to Figure 5, “Main project window”).
-
Select
File>New>Module from Existing Sources…. -
Locate the
build.gradlefile and select it. ClickOK. You will be directed to theImport Module from Gradlewindow (refer to Figure 6, “Import Module from Gradlewindow”).
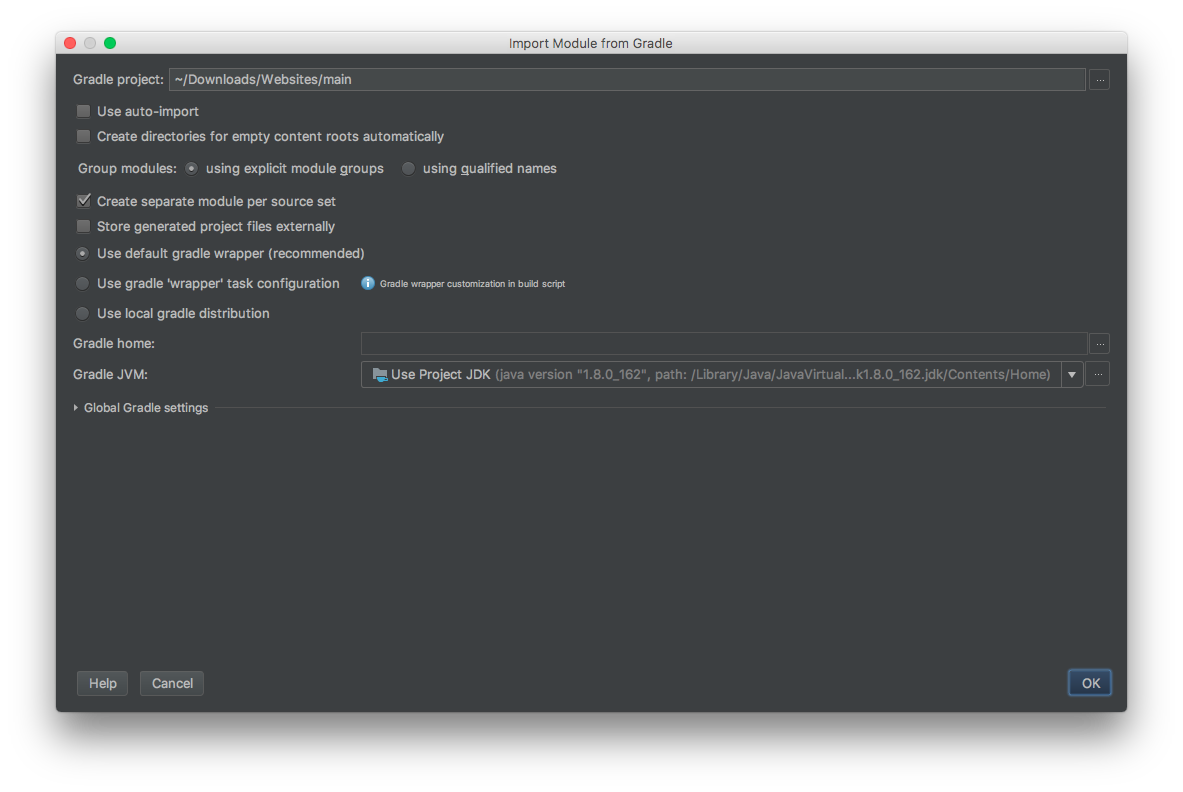
Import Module from Gradle window-
Click
OKto accept the default settings. -
Open the
Terminal(selectTool Windows>Terminal) and run the commandgradlew processResources(run./gradlew processResourcesfor Mac/Linux users). It should finish with theBUILD SUCCESSFULmessage.
This generates all the resources required by the application and its tests.
2.3. Verifying the setup
Follow these steps to verify that the project has been correctly set up:
-
Run
seedu.organizer.MainAppand try a few commands. You may refer to the UserGuide.adoc for more information about the commands. -
Run the tests to ensure they all pass.
2.4. Configuring the project before writing code
Before you begin development, there are a few configurations to be done to ensure that the code you write meets our project standards.
2.4.1. Configuring the coding style
This project follows oss-generic coding standards. IntelliJ’s default style is mostly compliant with the mentioned standard, but uses a different import order.
Follow these steps to ensure that your code adheres to the required coding standards:
-
Go to
File>Settings…(Windows/Linux), orIntelliJ IDEA>Preferences…(Mac). -
Select
Editor>Code Style>Java. -
Click on the
Importstab to set the import order.-
Set
Class count to use import with '\*'to999. This prevents the contraction of import statements. -
Set
Names count to use static import with '*'to999. This prevents the contraction of import statements. -
Set the following order in
Import Layout:import static all other imports,import java.*,import javax.*,import org.*,import com.*,import all other imports. Add a<blank line>between eachimport.
-
Optionally, you can follow the UsingCheckstyle.adoc document to configure Intellij to check for style-compliance as you write code.
2.4.2. Setting up CI
This project relies heavily on Travis to perform Continuous Integration (CI). You may also set up Travis for your fork. See UsingTravis.adoc to learn how to set it up.
After setting up Travis, you can optionally set up coverage reporting for your team fork (see UsingCoveralls.adoc).
| Coverage reporting could be useful for a team repository that hosts the final version, but is not particularly useful for your personal fork. |
Optionally, you can set up AppVeyor as a second CI (see UsingAppVeyor.adoc).
| Having both Travis and AppVeyor ensures the application works on both Unix-based platforms and Windows-based platforms (Travis is Unix-based and AppVeyor is Windows-based). |
2.5. Getting started with development
When you are ready to start development:
-
Read Section 3.1, “Architecture” to get an understanding of the overall design.
-
Read Section 4, “Implementation” to find out more about the major features, and how you can contribute enhancements to those features.
3. Design
PrioriTask consists of multiple components written in Java, with data being written and stored in XML files. This section contains an overview of the architecture systems used to design and implement the application, and an introduction to some of its major components.
3.1. Architecture
The Architecture Diagram given below (Figure 7, “Architecture diagram”) provides an overview of the high-level design of the application.
The .pptx files used to create diagrams in this document can be found in the diagrams folder. To update a diagram, modify the diagram in the pptx file, select the objects of the diagram, and choose Save as picture.
|
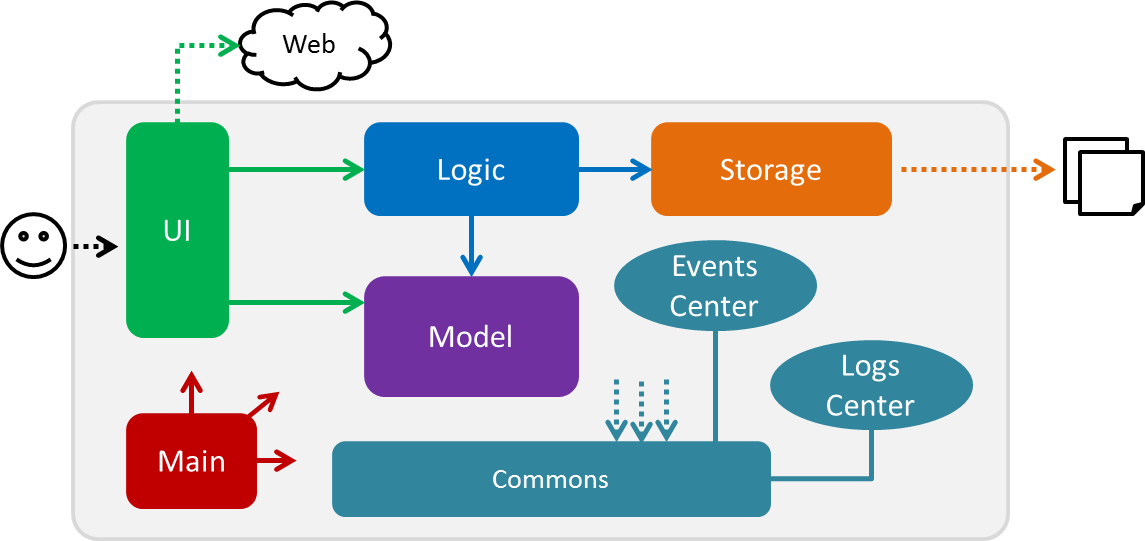
3.1.1. Primary components
There are two primary components of the application:
-
Main, which contains only one class calledMainApp. It is responsible for:-
Initializing all components in the correct sequence, and connecting them with each other at application launch.
-
Shutting down all components and invoking the cleanup method where necessary during application shut down.
-
-
Commons, contains a collection of classes used by multiple other components. Two of those classes play important roles at the architecture level.-
EventsCenter: This class (written using Google’s Event Bus library) is used by components to communicate with other components using events (i.e. a form of Event Driven design). -
LogsCenter: This class is used by many classes to write log messages to the application’s log file.
-
3.1.2. Secondary components
The rest of the application comprises of four components:
Each of the four components:
-
Defines its API in an
interfacewith the same name as the Component. -
Exposes its functionality using a
{Component Name}Managerclass.
For example, Logic (refer to Figure 8, “Class diagram of Logic”) defines it’s API in the Logic.java interface and exposes its functionality using the LogicManager.java class.
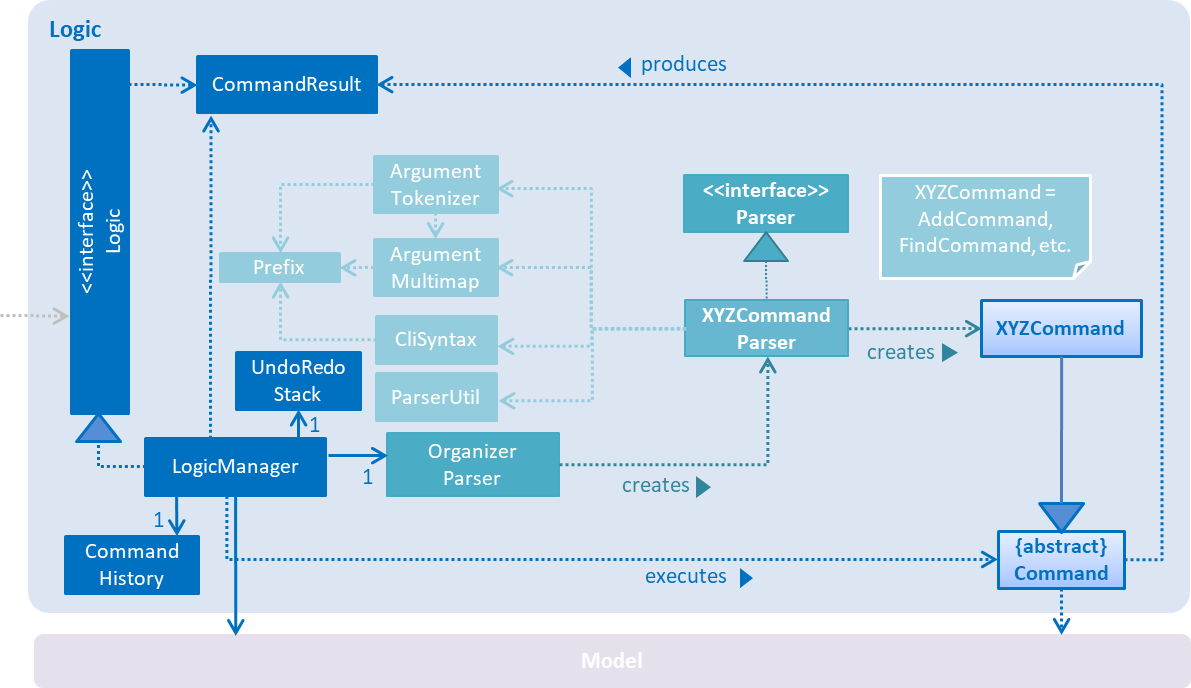
LogicMore Information
Events-Driven nature of the design
The Sequence Diagram (refer to Figure 9, “Component interactions for delete 1 command (part 1)”) shows how the components interact in a scenario where the user issues the command delete 1.
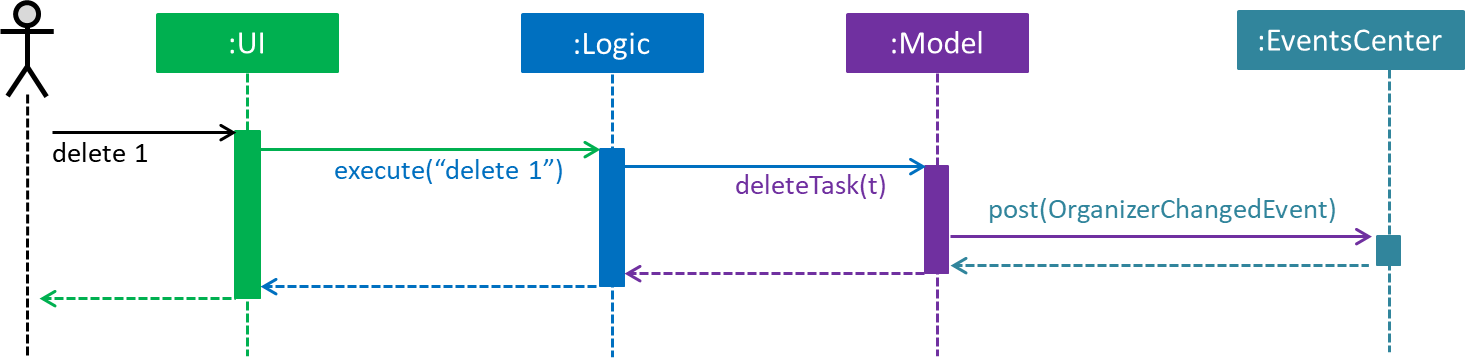
delete 1 command (part 1)
Note how the Model simply raises a OrganizerChangedEvent when the Organizer data are changed, instead of asking the Storage to save the updates to the hard disk.
|
The following diagram (refer to Figure 10, “Component interactions for delete 1 command (part 2)”) below shows how the EventsCenter reacts to that event. This eventually results in the updates being saved to the hard disk and the status bar of the UI being updated to reflect the 'Last Updated' time.
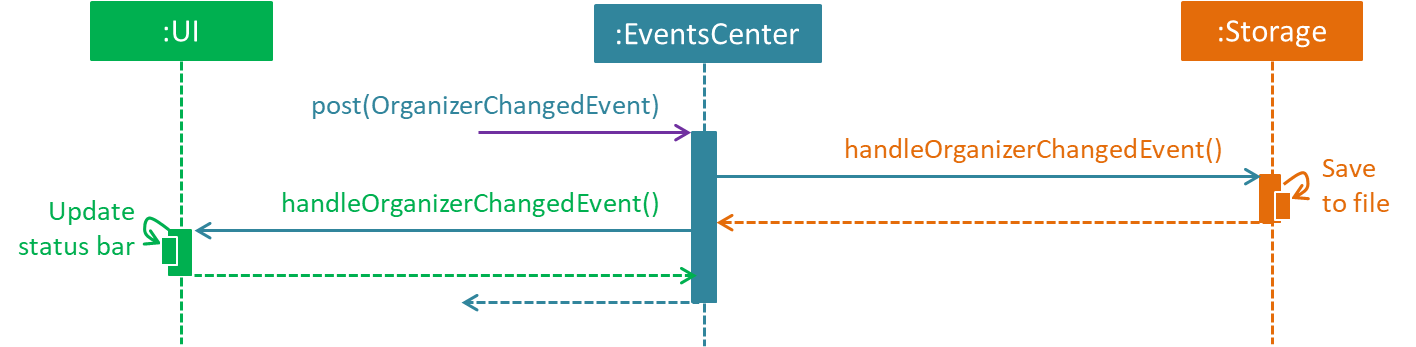
delete 1 command (part 2)
Note how the event is propagated through the EventsCenter to the Storage and UI without Model having to be coupled to either of them. This is an example of how this Event Driven approach helps us reduce direct coupling between components.
|
The following sections will provide more details on each of the 4 secondary components.
3.2. UI Component
UI consists of a MainWindow that is made up of numerous parts (e.g.CommandBox, ResultDisplay, TaskListPanel, StatusBarFooter, CalendarPanel, etc.).
These parts, including the MainWindow, inherit from the abstract UiPart class.
The class diagram below (refer to Figure 11, “Structure of UI”) describes the structure of UI.
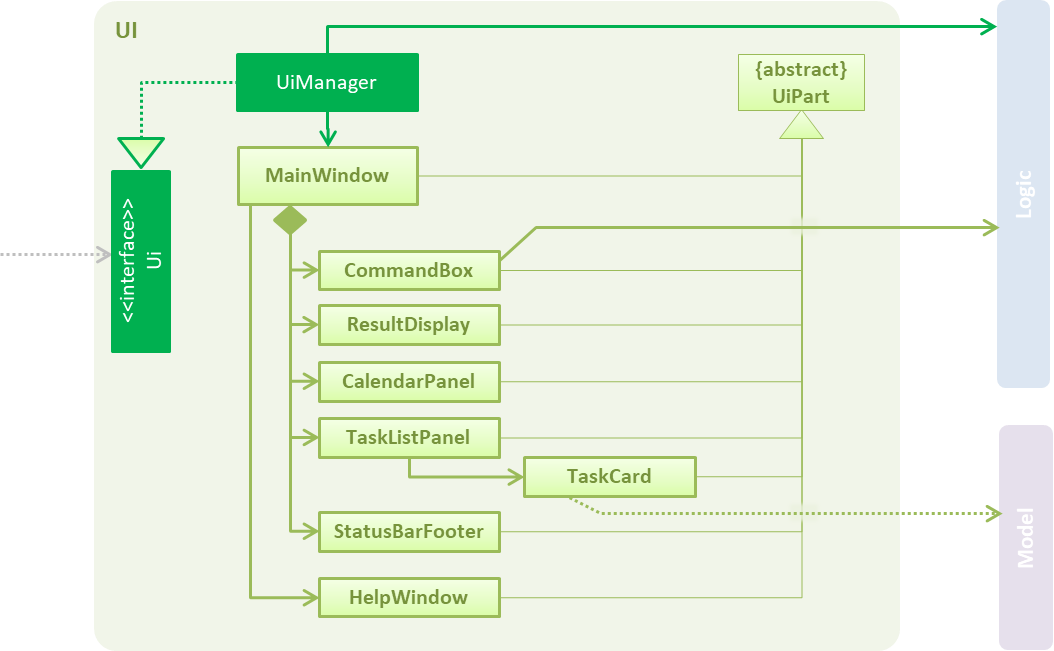
UIAPI : Ui.java
The JavaFX UI framework is used to build this component.
The layout of these UI parts are defined in matching .fxml files that are in the src/main/resources/view folder. For example, the layout of the MainWindow is specified in MainWindow.fxml.
UI:
-
Executes user commands using
Logic. -
Binds itself to some data in
Modelso that the UI can auto-update when data in theModelchanges. -
Responds to events raised from various parts of the application and updates the UI accordingly.
3.3. Logic Component
Logic consists of the commands and their respective parsers (if necessary).
Parser classes are defined in .java files suffixed with 'Parser', and are found in the src/main/java/logic/parser folder.
For example, the parser for AddCommand is defined in AddCommandParser.java.
The class diagram below (refer to Figure 12, “Structure of Logic”) gives an overview of the structure of Logic.
LogicAPI :
Logic.java
There are two types of commands.
Commands that modify the state of the organizer inherit from the UndoableCommand class, and are used by the undo/redo mechanism (see [Undo/Redo feature] for more information).
Commands that do not modify the state of the organizer, and cannot be undone, inherit from the Command class instead.
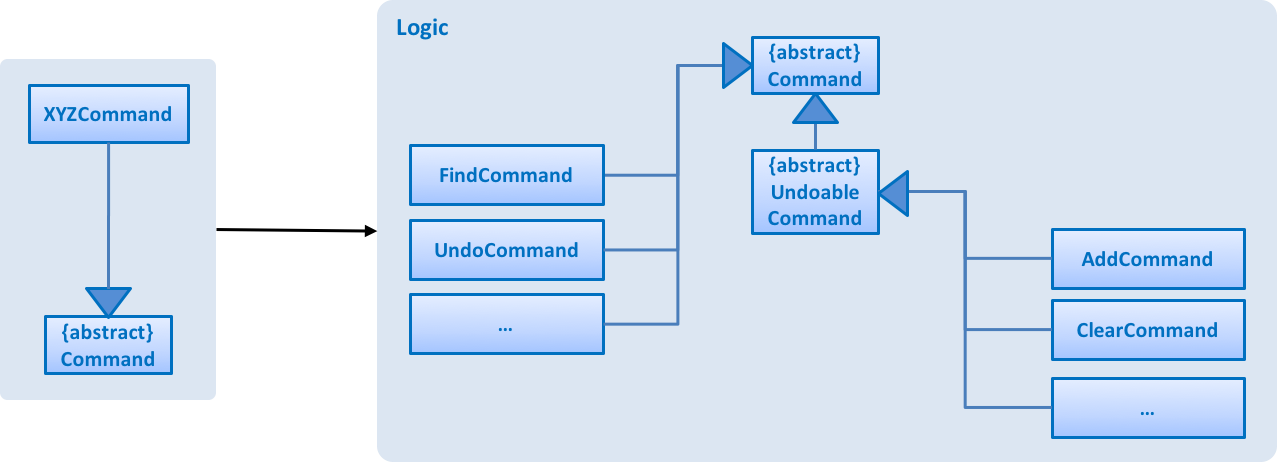
The class diagram below (refer to Figure 13, “Structure of commands in Logic”) gives a more detailed overview of how the command system in Logic works. It shows the finer details concerning XYZCommand and Command in Figure 12, “Structure of Logic”.
LogicGiven below (refer to Figure 14, “Interactions inside Logic for the delete 1 command”) is the sequence diagram for interactions within Logic for the execute("delete 1") API call.
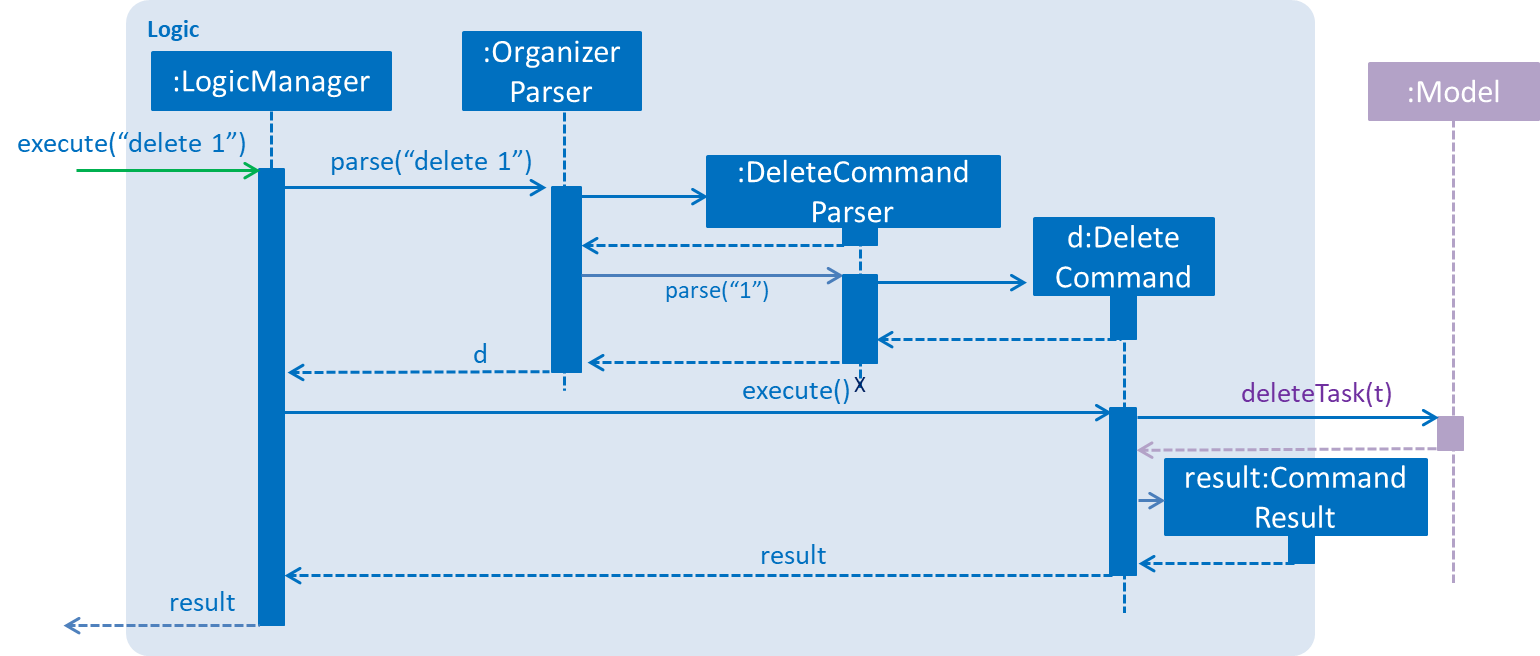
Logic for the delete 1 commandThe sequence flows as such:
-
Logicuses theOrganizerParserclass to parse the user command. -
Commandobject is created. -
Commandobject is executed by theLogicManager.The command execution can affect the Model(e.g. adding a task) and/or raise events. -
CommandResultobject is created as an encapsulation of the result of the command execution. -
CommandResultobject is passed toUI.
3.4. Model Component
Model consists of a UniqueTaskList, UniqueTagList, and UniqueUserList that contains and manipulates the data within the application using an ObservableList. The component also includes Task, and its respective parameters (e.g. Name, Priority, Date Added, etc.).
The class diagram below (refers to Figure 15, “Structure of Model”) gives an overview of the structure of model.
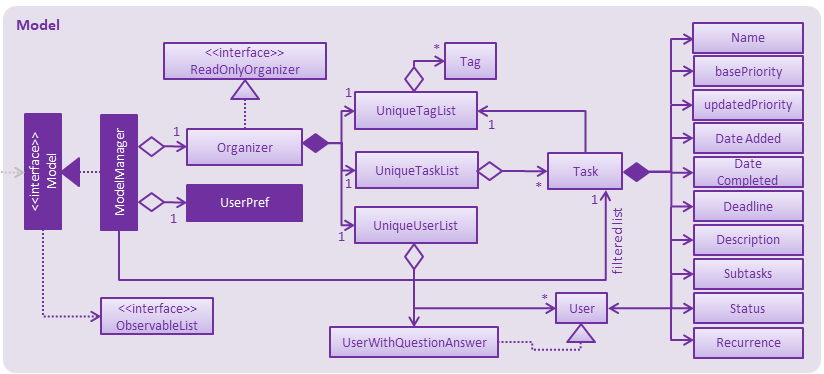
ModelAPI : Model.java
The Model:
-
stores a
UserPrefobject that represents the user’s preferences. -
stores the Organizer data.
-
updates Tasks' priority levels within the Organizer via the
UniqueTaskListautomatically. -
sorts tasks within the Organizer.
-
exposes an unmodifiable
ObservableList<Task>that can be 'observed' (e.g. the UI can be bound to this list so that the UI automatically updates when the data in the list changes). -
does not depend on any of the other three components.
3.5. Storage Component
Storage consists of the XmlOrganizerStorage, which reads data from, and writes data to, the hard disk.
Data is stored in XML format, and can be retrieved from data > organizer.xml.
This component also contains the UserPrefsStorage, which stores user preferences (e.g. the application window’s preferred height and width) in a JSON file. The file is titled preferences.json, and can be retrieved from the main folder.
The class diagram below (refer to Figure 16, “Structure of Storage”) gives an overview of the structure of Storage.
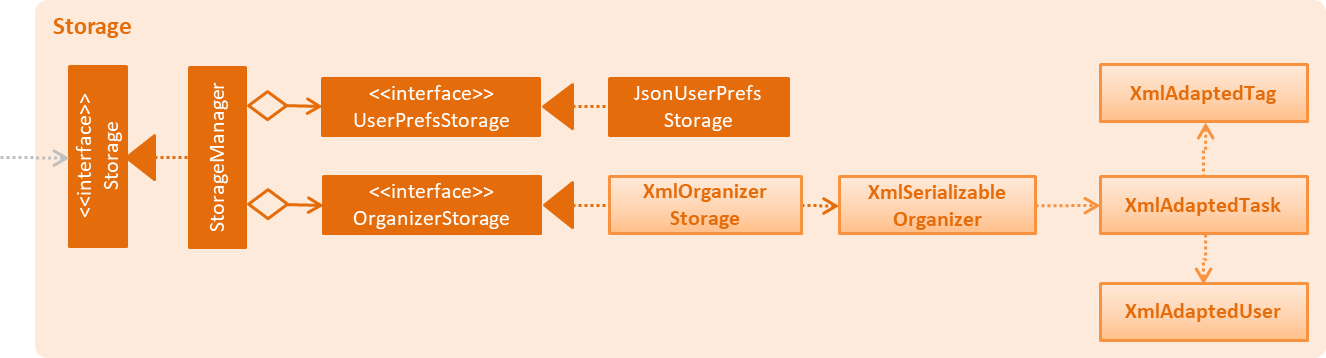
StorageAPI : Storage.java
Storage:
-
saves
UserPrefobjects in JSON format and reads it back. -
saves the Organizer data in XML format and reads it back.
4. Implementation
PrioriTask consists of many different features. This section describes some noteworthy details on how certain features are implemented.
4.1. Undo/Redo Feature
The undo feature restores PrioriTask to the state before the previous undoable command was executed. Undoable commands are defined as commands that modify PrioriTask’s content (e.g. add, delete, edit and clear).
The redo feature does the opposite - it reverses the most recent undo command.
4.1.1. Current Implementation
The undo/redo mechanism is facilitated by an UndoRedoStack, which resides inside LogicManager. It supports undoing and redoing of commands that modifies the state of the organizer (e.g. add, edit). Such commands inherit from UndoableCommand.
UndoRedoStack only deals with UndoableCommands. Commands that cannot be undone inherit from Command instead.
The following diagram (refer to Figure 17, “Structure of commands in the Logic”) shows the inheritance diagram for commands:
LogicUndoableCommand adds an extra layer between the abstract Command class and concrete commands that can be undone, such as the DeleteCommand. Note that extra tasks need to be done when executing a command in an undoable way, such as saving the state of the organizer before execution. UndoableCommand contains the high-level algorithm for those extra tasks while child classes implement the details of how to execute the class-specific command. Note that this technique of putting the high-level algorithm in the parent class and lower-level steps of the algorithm in child classes is also known as the template pattern.
Commands that are not undoable are implemented this way:
public class ListCommand extends Command {
    @Override
    public CommandResult execute() {
        // ... list logic ...
    }
}
With the extra layer, the commands that are undoable are implemented this way:
public abstract class UndoableCommand extends Command {
    @Override
    public CommandResult execute() {
        // ... undo logic ...

        executeUndoableCommand();
    }
}

public class DeleteCommand extends UndoableCommand {
    @Override
    public CommandResult executeUndoableCommand() {
        // ... delete logic ...
    }
}
4.1.2. Scenario
Suppose that the user has just launched the application. The UndoRedoStack will be empty at the beginning.
The user executes a new UndoableCommand, delete 5, to delete the 5th task in the organizer. The current state of the organizer is saved before the delete 5 command executes. The delete 5 command will then be pushed onto the undoStack (the current state is saved together with the command).
The diagram below illustrates how the execution of the delete 5 command affects the UndoRedoStack.

delete 5 command executionAs the user continues to use the program, more commands are added into the undoStack. For example, the user may execute add n/Study … to add a new task.
The diagram below (refers to Figure 19, “UndoRedoStack add n/Study … command execution”) illustrates how the execution of the add n/Study command affects the UndoRedoStack.
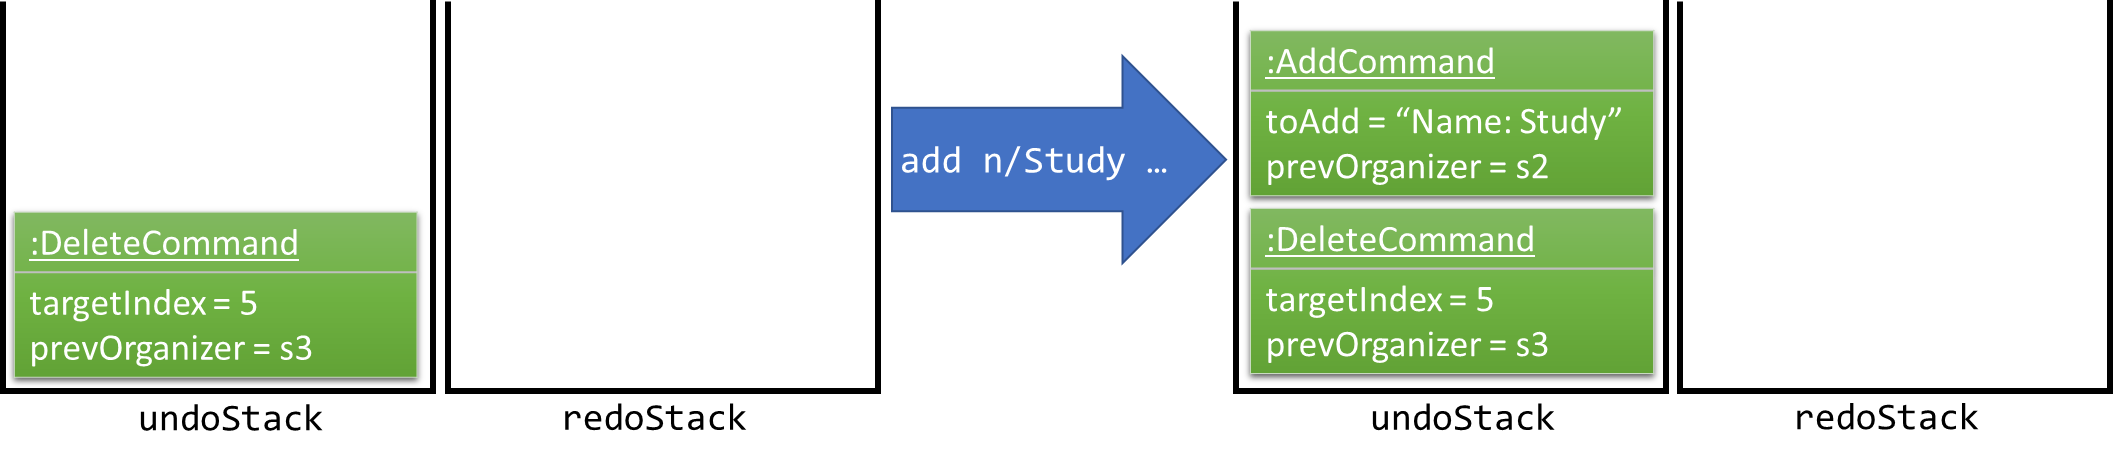
add n/Study … command execution
If a command fails its execution, it will not be pushed to the UndoRedoStack at all.
|
The user now decides that adding the task was a mistake, and decides to undo that action using undo.
We will pop the most recent command out of the undoStack and push it back to the redoStack. We will restore the organizer to the state before the add command executed.
The diagram below (refer to Figure 20, “UndoRedoStack undo command execution”) illustrates the process of the execution of the undo command on the UndoRedoStack.
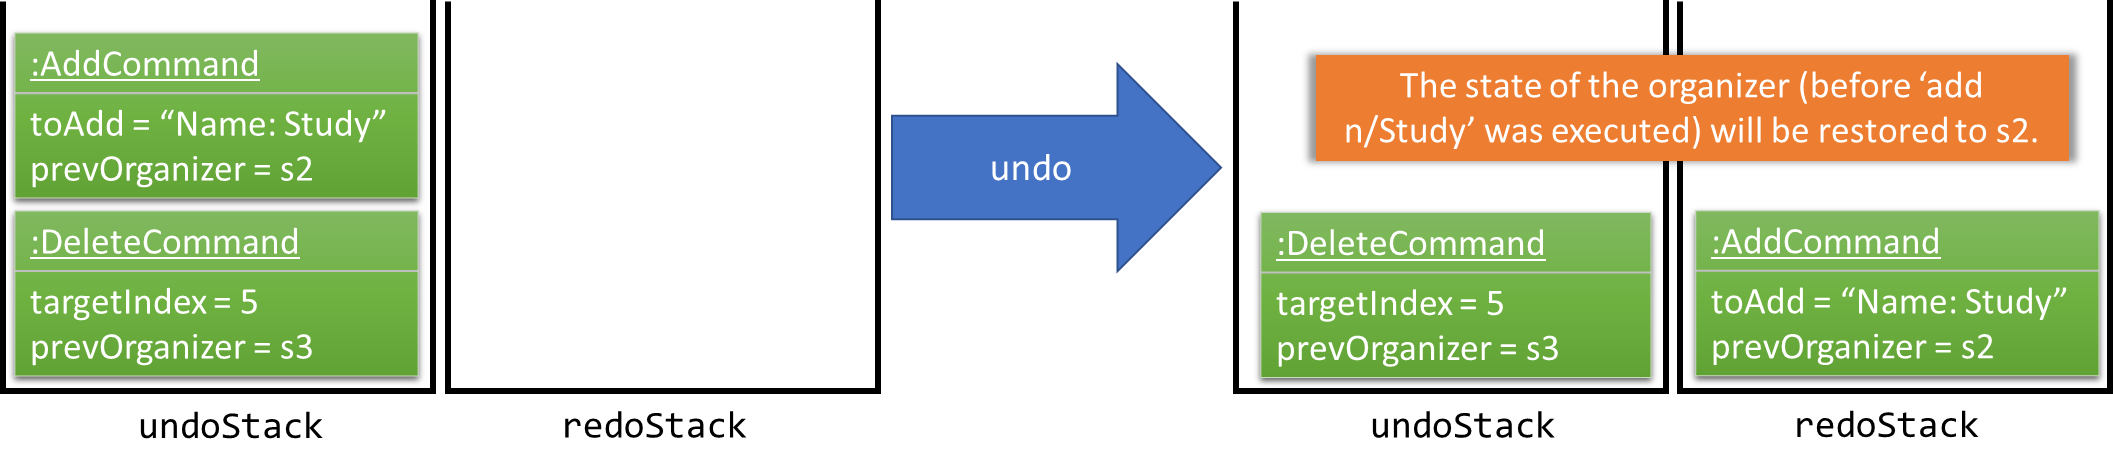
undo command execution
If the undoStack is empty, then there are no other commands left to be undone, and an Exception will be thrown when popping the undoStack.
|
The following sequence diagram (refer to Figure 21, “UndeRedoStack sequence diagram”) shows how the undo operation works:
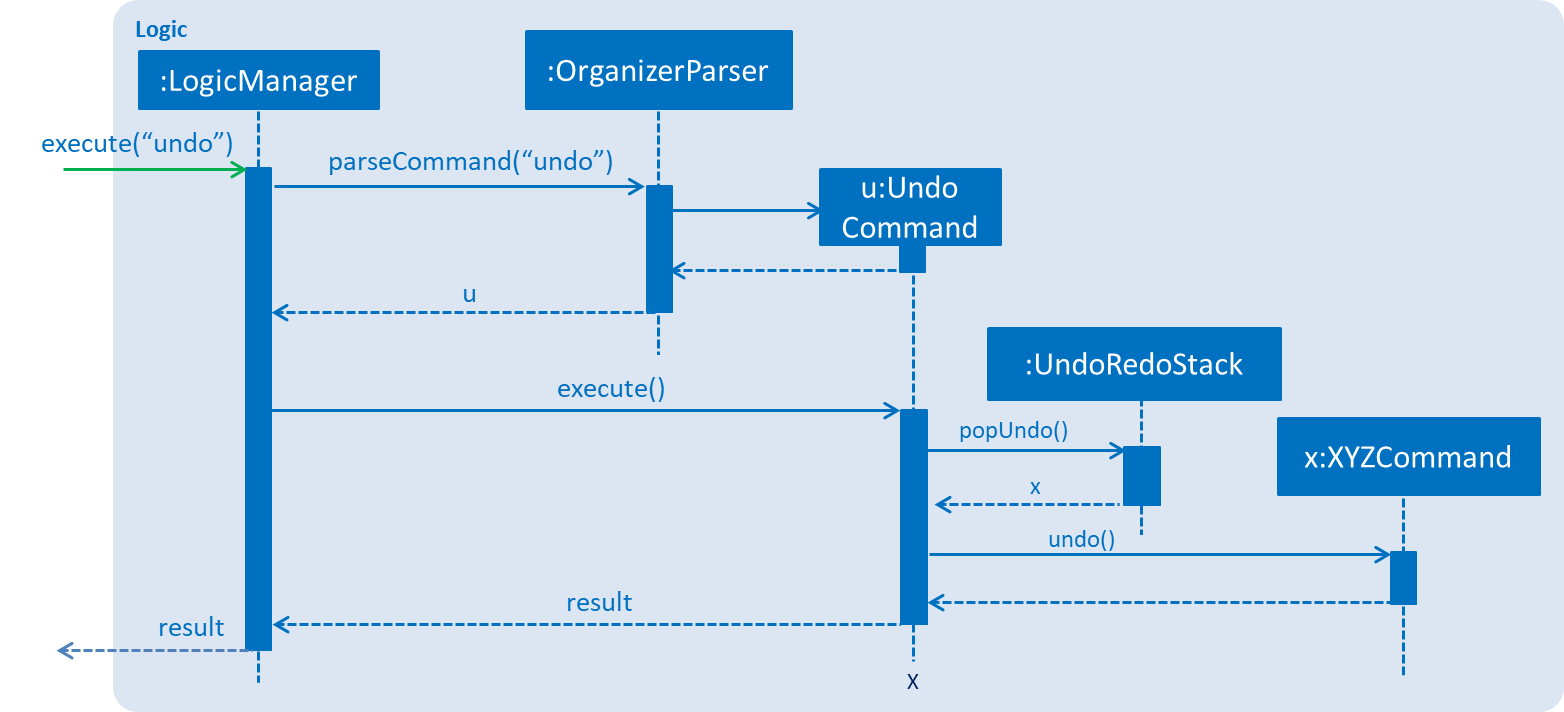
Redo does the exact opposite (pops from redoStack, pushes to undoStack, and restores the organizer to the state after the command is executed).
If the redoStack is empty, then there are no other commands left to be redone, and an Exception will be thrown when popping the redoStack.
|
The user now decides to execute a new command, clear. As before, clear will be pushed into the undoStack. This time the redoStack is no longer empty. It will be purged as it no longer make sense to redo the add n/Study command (this is the behavior that most modern desktop applications follow).
The diagram below (refer to Figure 22, “UndoRedoStack clear command execution”) illustrates how the execution of the clear command affects the UndoRedoStack.

clear command executionCommands that are not undoable are not added into the undoStack. For example, list, which inherits from Command rather than UndoableCommand, will not be added after execution (refer to Figure 23, “UndoRedoStack list command execution”).

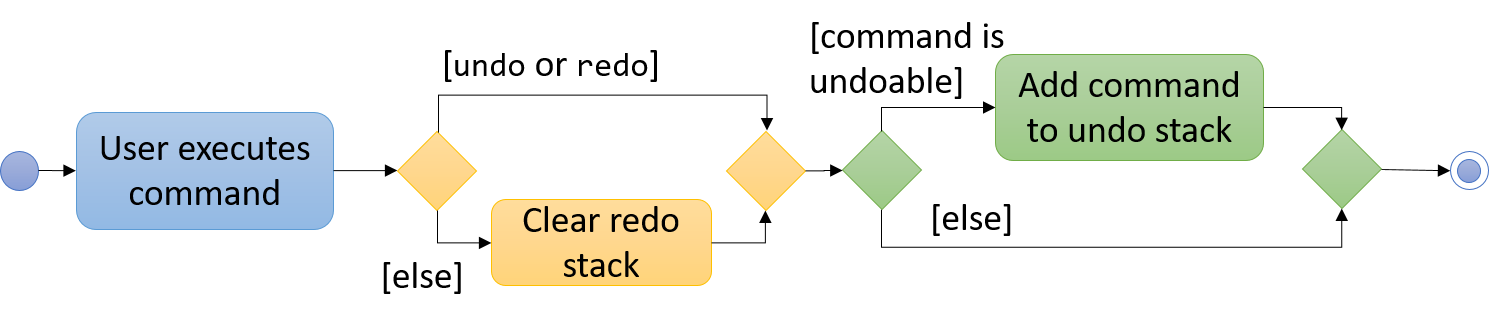
list command executionThe following activity diagram (refer to Figure 24, “UndoRedoStack activity diagram”) summarizes what happens inside the UndoRedoStack when a user executes a new command:
4.1.3. Design Considerations
4.1.3.1. Aspect: Implementation of UndoableCommand
-
Alternative 1 (current choice): Add a new abstract method
executeUndoableCommand()-
Pros: Any undone/redone functionality is not lost as it is now part of the default behaviour. Classes that deal with
Commanddo not have to know thatexecuteUndoableCommand()exist. -
Cons: It is hard for new developers to understand the template pattern.
-
-
Alternative 2: Just override
execute()-
Pros: It does not involve the template pattern, easier for new developers to understand.
-
Cons: Classes that inherit from
UndoableCommandmust remember to callsuper.execute(), or lose the ability to undo/redo.
-
4.1.3.2. Aspect: How undo & redo executes
-
Alternative 1 (current choice): Saves the entire organizer
-
Pros: It is easy to implement.
-
Cons: There may be performance issues in terms of memory usage.
-
-
Alternative 2: Individual command knows how to undo/redo by itself
-
Pros: It will use less memory (e.g. for
delete, just save the task being deleted). -
Cons: There is a need to ensure that the implementation of the counter to each command is correct.
-
4.1.3.3. Aspect: Type of commands that can be undone/redone
-
Alternative 1 (current choice): Only include commands that modifies the organizer (
add,clear,edit).-
Pros: It only reverts changes that are hard to change back (the view can easily be re-modified as no data are * lost).
-
Cons: A user might think that undo also applies when the list is modified (undoing filtering for example), * only to realize that it does not do that, after executing
undo.
-
-
Alternative 2: Include all commands.
-
Pros: It might be more intuitive for the user.
-
Cons: A user has no way of skipping such commands if he or she just want to reset the state of the organizer and not the view. Additional Info: See our discussion here.
-
4.1.3.4. Aspect: Data structure to support the undo/redo commands
-
Alternative 1 (current choice): Use separate stack for undo and redo
-
Pros: Easy to understand for new Computer Science student undergraduates, who are likely to be * the new incoming developers of our project.
-
Cons: Logic is duplicated twice. For each new command executed, both
HistoryManagerandUndoRedoStackmust be updated.
-
-
Alternative 2: Use
HistoryManagerfor undo/redo-
Pros: Do not need to maintain a separate stack, and just reuse what is already in the codebase.
-
Cons: Requires dealing with commands that have already been undone: Must remember to skip these commands. Violates Single Responsibility Principle and Separation of Concerns as
HistoryManagernow needs to do two * different things.
-
4.2. Task’s Priority Auto-updating and Auto-sorting feature
4.2.1. Current Implementation
The autoupdating and autosorting mechanism resides inside UniqueTaskList. The UniqueTaskList is responsible for updating each Task’s priority level and sorting the ObservableList<Task> whenever a new Task is added. In addition, whenever a Task is edited, the ObservableList<Task> is sorted again.
4.2.1.1. Description of UniqueTaskList 's add method
The add method of the UniqueTaskList class is implemented as such:
public void add(Task toAdd) throws DuplicateTaskException {
    //check non null and no duplicate task
    toAdd = updatePriority(toAdd);
    internalList.add(toAdd);
    sortTasks();
}
4.2.1.2. Priority Auto-updating feature
The updatePriority method returns a new Task with a new Priority based on the current date, AddedDate, and Deadline.
The new Priority level will remain within the range of 0 - 9. The new Priority is calculated as such :
-
If the current date is equal to the
AddedDate, and the current date is equals or after theDeadline.-
Priorityremains the same.
-
-
If the current date is past the
Deadline.-
Priorityis set to theHIGHEST_SETTABLE_PRIORITY_LEVEL: 9
-
-
If the current date is before the
Deadlineand not equal to theAddedDate.-
Priorityis calculated via the following formula :
-
priorityDifferenceFromMax = HIGHEST_SETTABLE_PRIORITY_LEVEL - currentPriority

dayDifferenceCurrentToDeadline = Duration.between(currentDate, deadline)

dayDifferenceAddedToDeadline = Duration.between(dateAdded, deadline)

priorityToIncrease = priorityDifferenceFromMax * ((dayDifferenceAddedToDeadline - dayDifferenceCurrentToDeadline) / dayDifferenceAddedToDeadline)

newPriority = currentPriority + priorityToIncrease
The new Task with its updated Priority will then be added to UniqueTaskList’s internalList. Following that, the internalList is sorted via the sortTasks method. The sortTasks method is implemented as such:
private void sortTasks() {
    internalList.sort(Task.priorityComparator());
}
4.2.1.3. Task Auto-sorting feature
The sortTasks method makes use of the ObservableList class’s sort method and Task’s priorityComparator method. The priorityComparator method returns a Comparator that sorts Task s based on descending Priority levels. The internalList is sorted with respect to the comparator.
4.2.2. Scenario
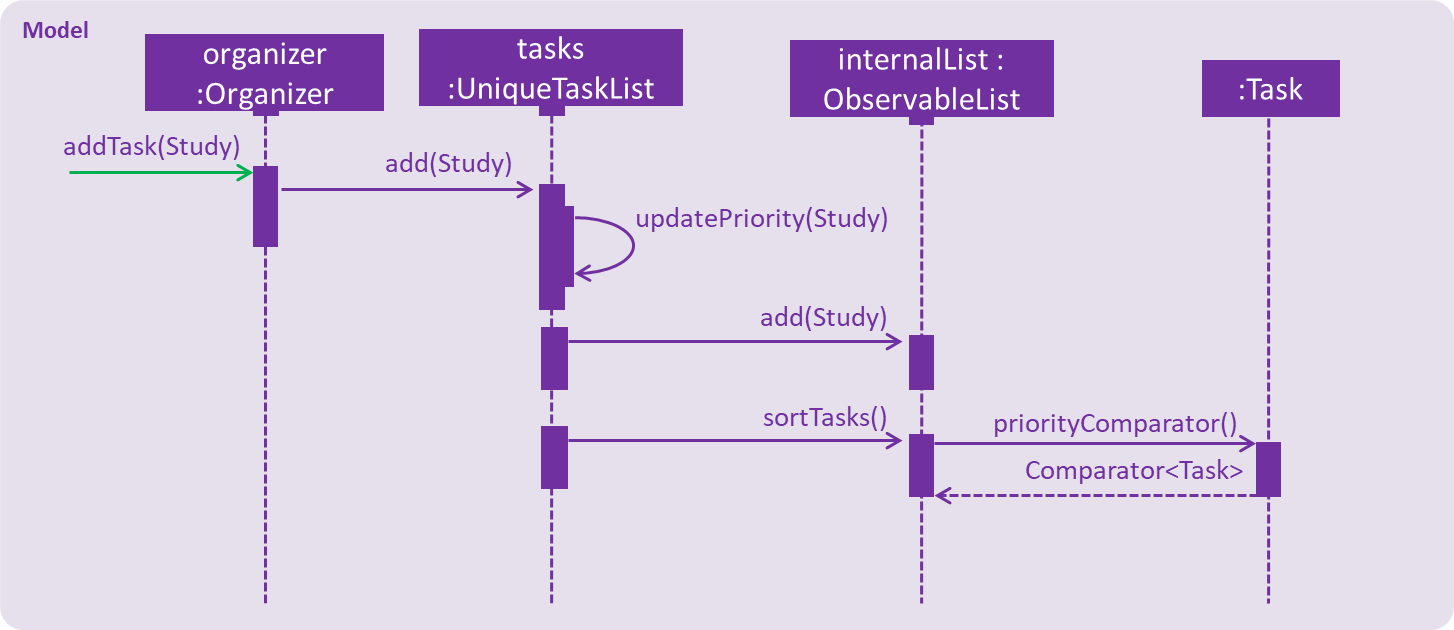
Consider an addTask method call by the Organizer. The current date is 2018-03-19.
The following is a sequence diagram (refer to Figure 25, “addTask(Study) method execution sequence diagram”) which represents the Organizer adding a Study Task.
Suppose the tasks currently contains the following two Task s as shown in Figure 26, “tasks 's initial Task s”.
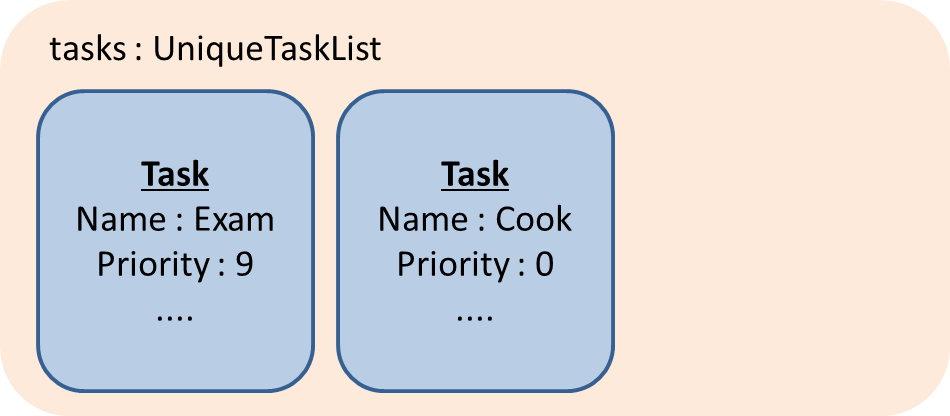
tasks 's initial Task sFigure 27, “"Study" Task” represents the "Study" Task.
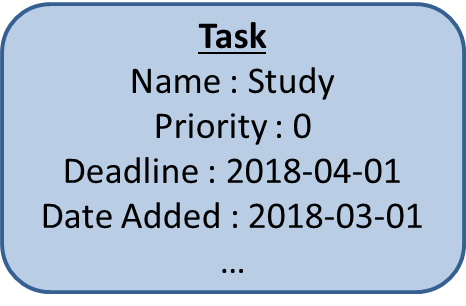
TaskWhen tasks calls updatePriority(Study), the new priority level is calculated as such :
priorityDifferenceFromMax = 9 - 0 = 9
dayDifferenceCurrentToDeadline = 14
dayDifferenceAddedToDeadline = 31
priorityToIncrease = 9 * ((31 - 14) / 31) = 4
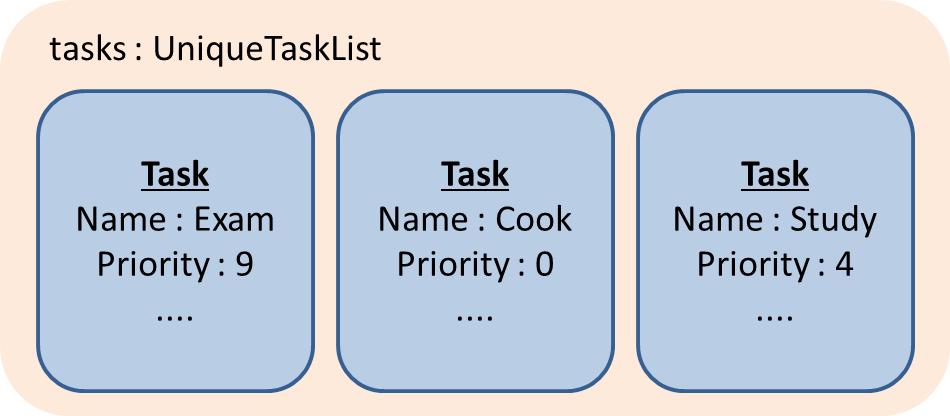
newPriority = 0 + 4 = 4A new "Study" Task is created and added to the internalList as shown in Figure 28, “internalList after "Study" Task is added”.
internalList after "Study" Task is addedThe sortTasks method is then called, which calls the priorityCompartor method, and uses the Comparator returned to sort the Task s. This results in the following UniqueTaskList as show in Figure 29, “internalList after sortTasks is called”.
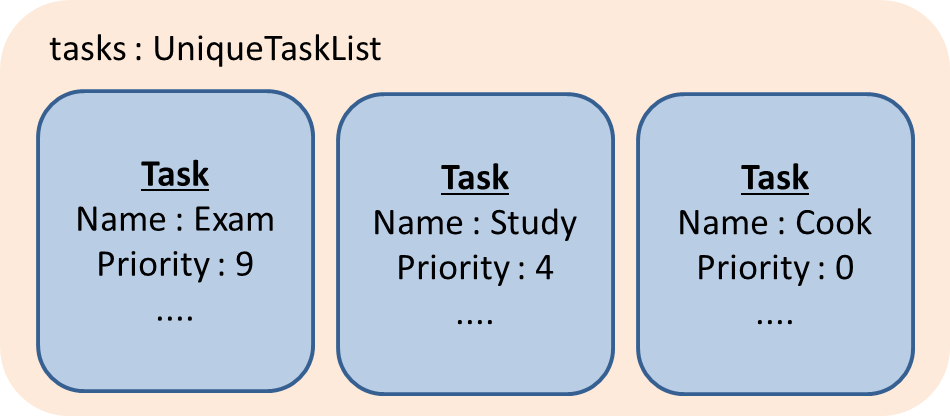
internalList after sortTasks is called4.2.3. Design Considerations
4.2.3.1. Aspect : Implementation of updatePriority
-
Alternative 1 (current choice): Add a new method
updatePriorityin UniqueTaskList’sadd-
Pros : It is convenient to update the priority during this method call; since during initialization of
Organizer,addis called for everyTaskto initialize theUniqueTaskList. -
Cons : There is a possible violation of Single Responsibility Principle and Separation of Concerns as
UniqueTaskListnow updatesTaskpriorities and storesTasks.
-
-
Alternative 2 : Add a new class
UpdatedUniqueTaskListwhich extendsUniqueTaskList-
Pros : This prevents the violation of Single Responsibility Principle and Separation of Concerns in Alternative 1.
-
Cons : This repeats the logic in
UniqueTaskListby adding one method.
-
4.2.3.2. Aspect : How updatePriority executes
-
Alternative 1 (current choice) : Return a new
Taskwith newPriority-
Pros : It is easy to implement.
-
Cons : A new object is created twice during every addition, even if
Priorityis not updated; Hence slightly inefficient.
-
-
Alternative 2 : Edit the
Priorityparameter of theTask-
Pros : No new objects are created.
-
Cons : It requires a major overhaul of
Taskand it’s parameters to be mutable.
-
4.2.3.3. Aspect : Scope of updatePriority and sortTasks
-
Alternative 1 (current choice) : Implement within
Model-
Pros : There is no need to deal with commands, and fits with the idea of automation.
-
Cons : The concern of updating priorities and sorting tasks may not lie with
ModelbutLogic.
-
-
Alternative 2 : Implement within
Logic-
Pros : It fits with the concern of updating priorities and sorting tasks.
-
Cons : It requires development of commands and extra command calls to be automatically called upon start of application; unnecessary trouble for same feature.
-
4.3. Calendar Feature
The Calendar resides mainly in the UI component, constantly interacting with the Logic and Model components to complete its tasks. It allows users to have a chronological overview of the deadlines of all their tasks. Tasks on the calendar changes according to the last task listing. By default, users will view the current month when they first open PrioriTask.
The calendar feature is currently in its early stages of implementation. At present, it only supports the switching between months, and is best viewed fully-maximised on a 13” computer screen.
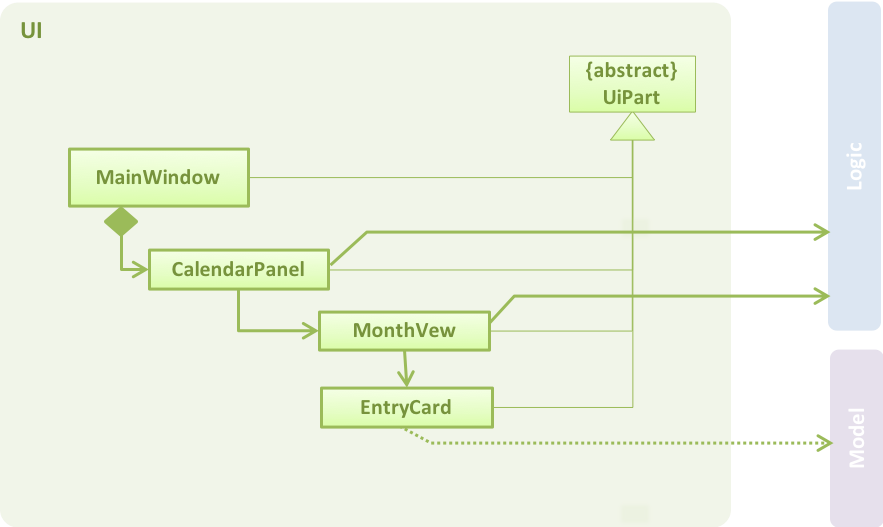
4.3.1. Current Implementation
The calendar feature is facilitated by the MonthView class, which supports the CalendarPanel. The MonthView is responsible for displaying a monthly calendar view to the users through the CalendarPanel. The following diagram (refer to Figure 30, “Structure of the Calendar Feature”) illustrates the structure of the calendar feature system:
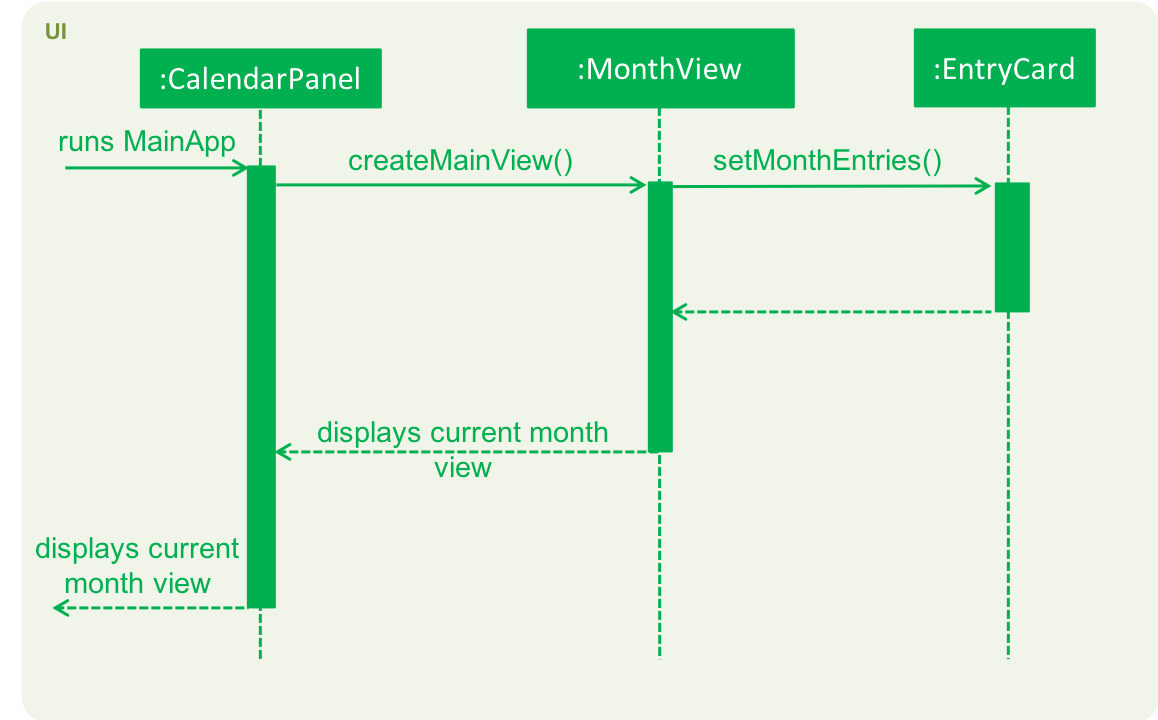
The following sequence diagram (refer to Figure 31, “Calendar Sequence Diagram”) illustrates how the different classes work together to display the calendar when users first run the application.
Below describes the the implementation of the different classes supporting the calendar feature.
4.3.1.1. Implementation of EntryCard
EntryCard is responsible for displaying the name of a Task on the calendar. It is called by MonthView when mapping each Task to an EntryCard. The method is implemented as such:
private ObservableList<EntryCard> getEntryCardsList(int year, int month) {
    FilteredList<Task> filteredList = getFilteredTaskList(year, month);
    SortedList<Task> taskSortedList = getSortedTaskList(filteredList);

    return EasyBind.map(taskSortedList, (task) -> new EntryCard(task));
}
An EntryCard will be added to a specific date which reflects the deadline of the Task. It is displayed on the calendar with the help of the JavaFX ListView object. More details of how this is implemented is further discussed in Section 4.3.1.2, “Implementation of MonthView”.
4.3.1.2. Implementation of MonthView
MonthView is in charge of executing several tasks. It is responsible for,
-
Drawing the month view of the calendar, and populating the dates.
-
Adding the tasks’ entries onto the calendar, according to the last task listing. The calendar is also updated every time an undoable command is executed (refer to [Undo/Redo feature] for more details about an undoable command).
-
Aiding the
Logiccomponent by switching the month view accordingly when users execute the respective calendar feature commands (e.g.pmonth,nmonth, etc.). A calendar feature command is defined as a command that changes the display of the calendar. For the full list of calendar feature commands, head to User Guide: Calendar Features.
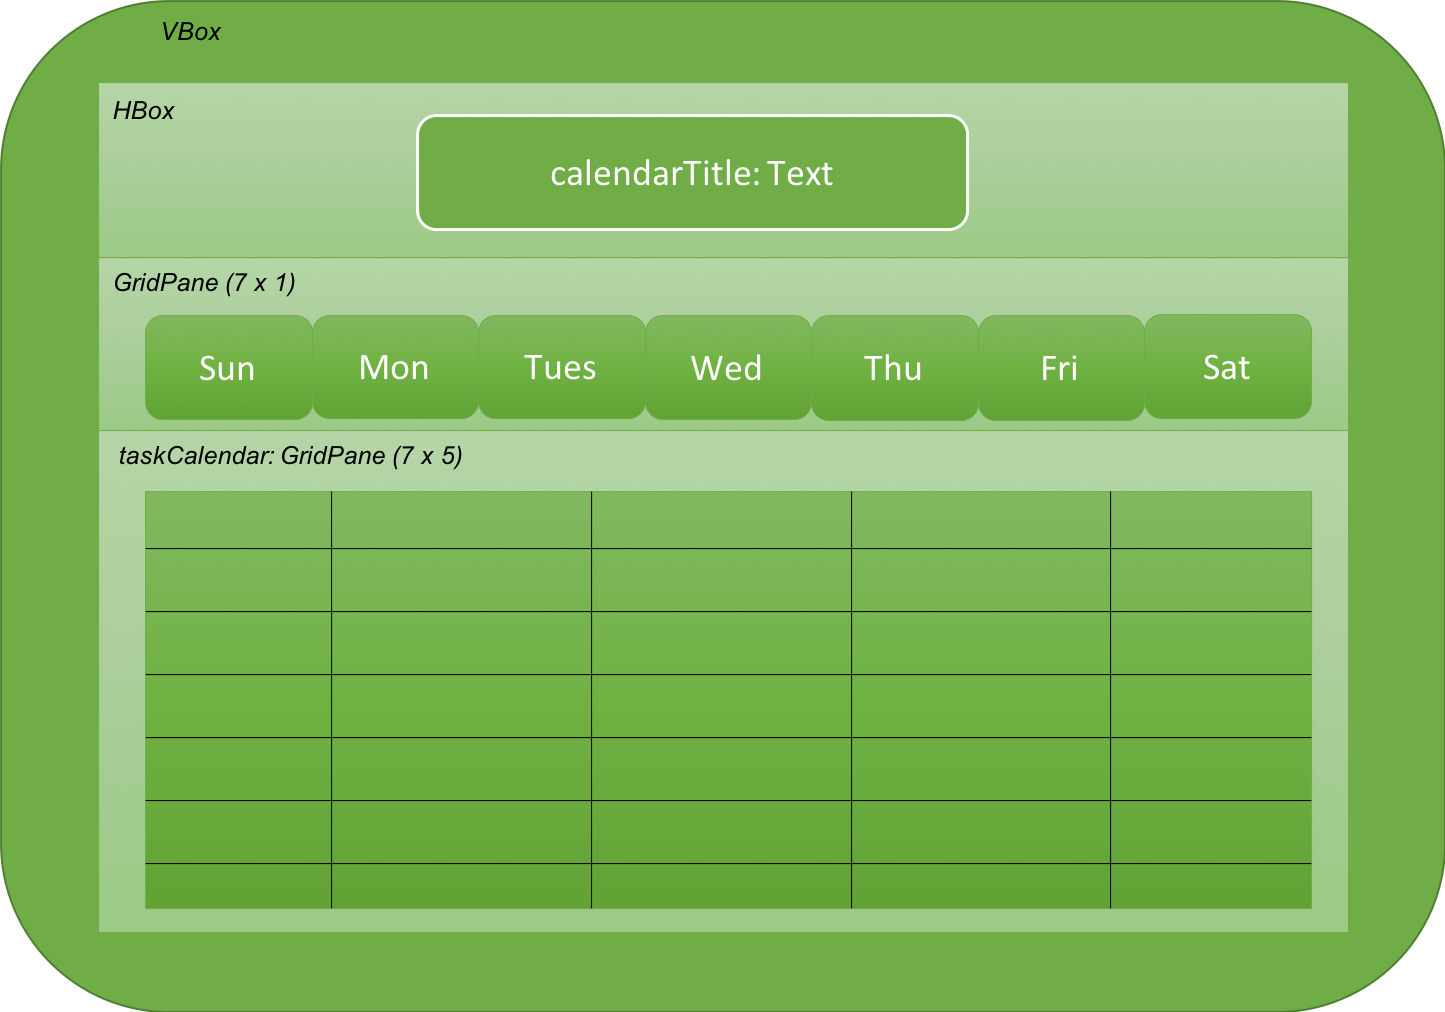
MonthView interacts very closely with its corresponding FXML file, MonthView.fxml to execute its tasks. The FXML file reflects the basic layout of the calendar feature, which is illustrated by Figure 32, “Basic Calendar Layout”.
MonthView` uses the JavaFX layout objects extensively when executing its tasks. The following are some instances when JavaFX layout objects are called:
-
Populating the dates in the calendar: Adding a
Textobject, which contains the numerical value of a particular date, to the exact column and row in thetaskCalendar. The method is implemented as such:
private void addMonthDate(Text dateToPrint, int column, int row) {
    // To update the JavaFX component from a non-JavaFX thread
    Platform.runLater(new Runnable() {
        @Override
        public void run() {
            taskCalendar.add(dateToPrint, column, row);
        }
    });

    taskCalendar.setHalignment(dateToPrint, HPos.LEFT);
    taskCalendar.setValignment(dateToPrint, VPos.TOP)
    dateToPrint.setId("date" + String.valueOf(dateCount));
}-
Adding the tasks’ entries onto the calendar: Adding a
ListViewobject, which contains a list ofEntryCard`s, to the exact column and row in the `taskCalendar. AnEntryCardrepresents a task entry, which will be added to the date which reflects the deadline of the task. The method is implemented as such:
private void addEntryListView(ObservableList<EntryCard> toAddObservableList, int row, int column) {
    ListView<EntryCard> entries = new ListView<>();
    entries.setId("entry" + String.valueOf(row) + String.valueOf(column));
    entries.setItems(toAddObservableList);
    entries.setCellFactory(listView -> new EntryListViewCell());
    entries.setMaxHeight(60);

    // To update the JavaFX component from a non-JavaFX thread
    Platform.runLater(new Runnable() {
        @Override
        public void run() {
            taskCalendar.add(entries, column, row);
        }
    });

    taskCalendar.setValignment(entries, VPos.BOTTOM);
}
MonthView also works very closely with the Logic component to accomplish,
-
Adding of the tasks’ entries onto the calendar, by retrieving an unmodifiable
ObservableListcontaining the list ofTask`s. A listener to added to the `ObservableListso that the calendar is updated with the latest tasks’ entries when a change in the list is detected. The method is implemented as such:
private void addListenerToTaskList() {
    taskList.addListener(new ListChangeListener<Task>() {
        @Override
        public void onChanged(Change change) {
            while (change.next()) {
                clearCalendar();
                setMonthCalendarDatesAndEntries(viewYearMonth.getYear(), viewYearMonth.getMonthValue());
            }
        }
    });
}-
Switching the month view when users execute the respective calendar feature commands, by retrieving an
ObservableListcontaining a list of executed commands by the user. A listener is added to theObservableListso that the month view is changed accordingly when a calendar feature command in the list is detected. The method is implemented as such:
private void addListenerToExecutedCommandsList() {
    executedCommandsList.addListener(new ListChangeListener<String>() {
        @Override
        public void onChanged(Change change) {
            while (change.next()) {
                int size = executedCommandsList.size();
                String executedCommand = executedCommandsList.get(size - 1);

                if ((executedCommand.equals(CurrentMonthCommand.COMMAND_WORD)) || (executedCommand.equals(CurrentMonthCommand.COMMAND_ALIAS))) {
                    goToCurrentMonth();
                }

                // … other similiar if statements for the remaining calendar feature commands ...
            }
        }
    });
}
4.3.1.3. Implementation of CalendarPanel
CalendarPanel simply displays the calendar, by using the JavaFX StackPane object as a placeholder for MonthView, which contains the basic layout of the calendar. After loading its own FXML file, it will fetch the display for MonthView as such:
private void createMainView() {
    monthView.getMonthView(currentYearMonth);
    calendarPane.getChildren().add(monthView.getRoot());
}
4.3.2. Scenario
Suppose the user executes a calendar feature command. Figure 33, “Calendar Sequence Diagram” shows the interactions within the Logic and UI components for the execute(“nmonth”) API call.
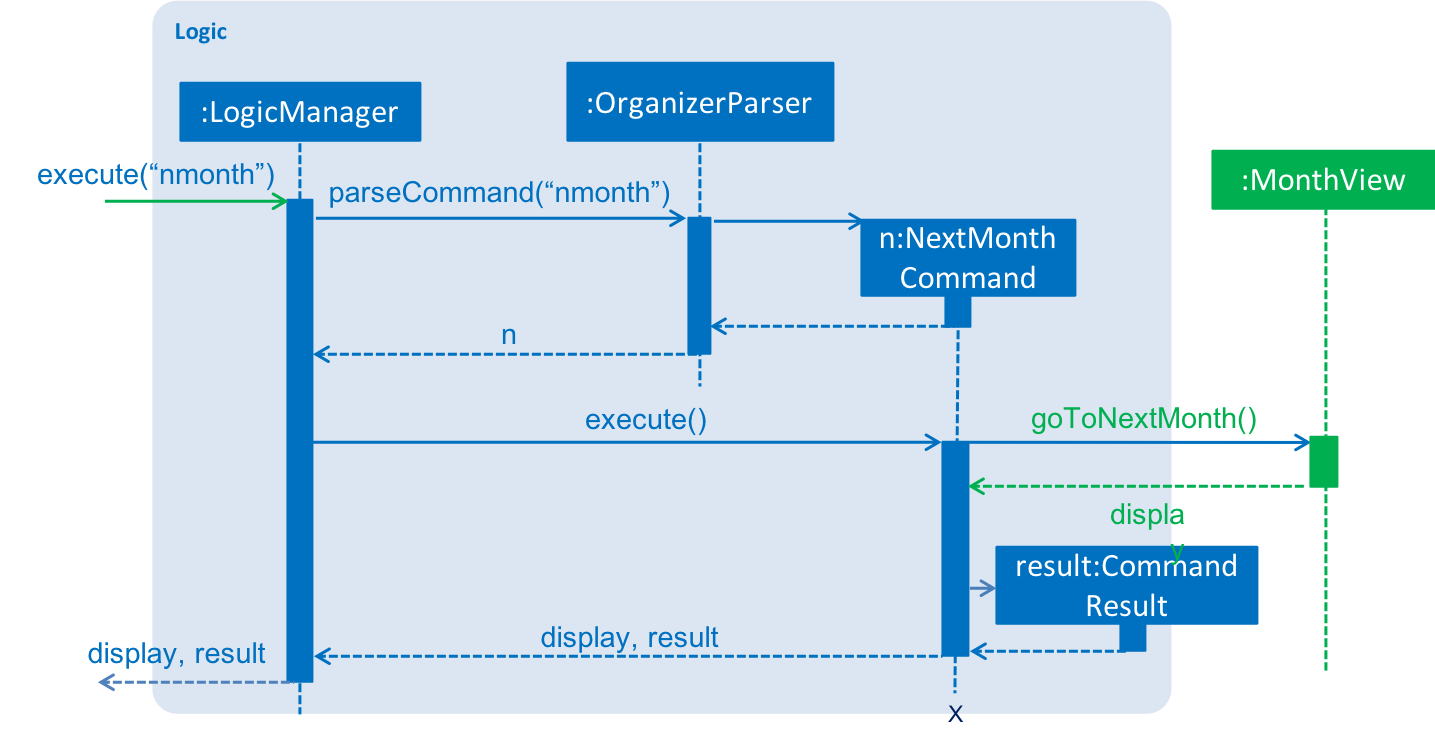
The sequence flow is slightly similar to that of the execution of a normal command (refer to Figure 14, “Interactions inside Logic for the delete 1 command”), and is as follows:
-
Logicuses theOrganizerParserclass to parse the calendar feature command. -
This results in a
Commandobject which is executed by theLogicManager. -
The command execution triggers the
MonthViewclass in theUI, which will display the new month view. -
The result of the command execution is encapsulated as a
CommandResultobject which is passed to theUI. It will be shown in theResult Display Box.
4.3.3. Design Considerations
4.3.3.1. Aspect: Implementation of calendar feature
-
Alternative 1 (current choice): Draw the calendar manually using the JavaFX library
-
Pros: The feature is customised for PrioriTask.
-
Cons: There is a need to invest a lot of time into creating a feature that has been already been developed and freely available.
-
-
Alternative 2: Use a third-party framework / library
-
Pros: This speeds up development, especially if it has already been thoroughly tested and does not have many bugs.
-
Cons: It is not customised for the application, and may require much time to tweak or work around the framework / library to suit the application.
-
4.3.3.2. Aspect: Updating of tasks’ entries on the calendar
-
Alternative 1 (current choice): Clears the calendar, and draws everything (i.e. the dates and entries) again
-
Pros: It is easy to implement.
-
Cons: There may be performance issues (there may be lag during execution of undoable commands).
-
-
Alternative 2: Track the
Taskthat is being added / modified, and update the calendar accordingly-
Pros: The update of the calendar will be almost instantaneous. The chances of lag is rare.
-
Cons: It is difficult to implement. There is a need to ensure that the tracking of
Tasks added / modified is accurate.
-
4.4. Subtask
4.4.1. Current Implementation
Subtask feature allows users to split their tasks into multiple subtasks. This feature allows users to better
manage their task. It is implemented using Subtask class and UniqueSubtaskList class as shown by Figure 34, “Subtask UML Class Diagram” below:
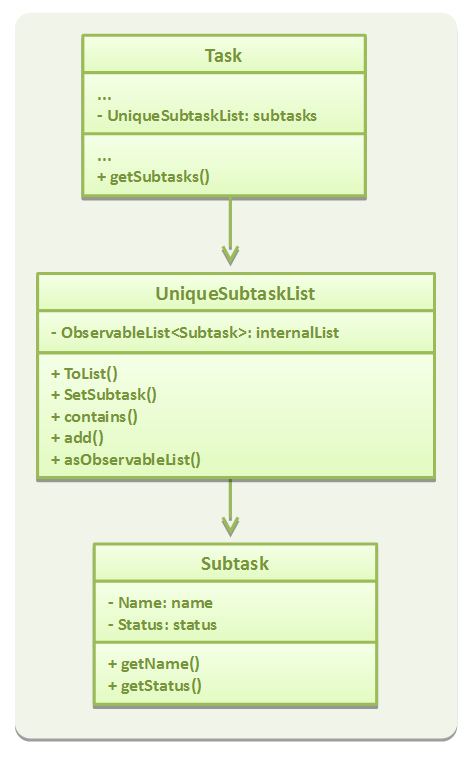
UniqueSubtaskList is created to ensure that no task has a duplicated subtask.
Subtask management
To manage the subtasks (Add, edit, etc), a copy of the Task object is created, since Task is immutable.
4.4.2. Design Considerations
4.4.2.1. Aspect: Implementation of Subtask
-
Alternative 1 (current implementation): Add a new class
Subtask-
Pros: There is better isolation, and allows for easier modification to
Subtaskif needed. -
Cons: It restricts the possibility of having a subtask that has subtasks.
-
-
Alternative 2: Use current
Taskclass-
Pros: It is easier to implement and subtask will share the same properties with
Task. -
Cons: There is a ossibility of having a cyclic subtask (a task that is also a subtask of it self) if not handled carefully.
-
4.4.2.2. Aspect: Implementation of UniqueSubtaskList
-
Alternative 1 (current implementation): Use
Listto store subtasks.-
Pros: It is easier to implement.
-
Cons: There will be performance issues when data is large, since most operations in
UniqueSubtaskListisO(n).
-
-
Alternative 2 (Planned for implementation): Use a combination of BBST and LinkedList to store subtasks.
-
Pros: If is faster than the first alternative since each operation is
O(log n). -
Cons: It is harder to implement and more robust testing is required since it is more bug prone.
-
4.5. Recurring Tasks
Recurring Tasks feature allows users to recur tasks weekly using the RecurWeeklyCommand. It also allows users to delete a task and all its recurred versions using the DeleteRecurredTasksCommand.
4.5.1. Current Implementation
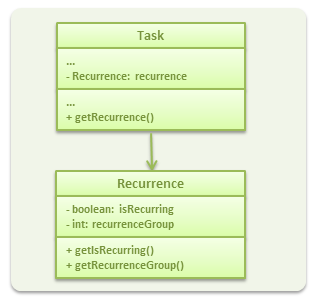
The recurring task feature is implemented through a Recurrence component, which is a parameter for Task.
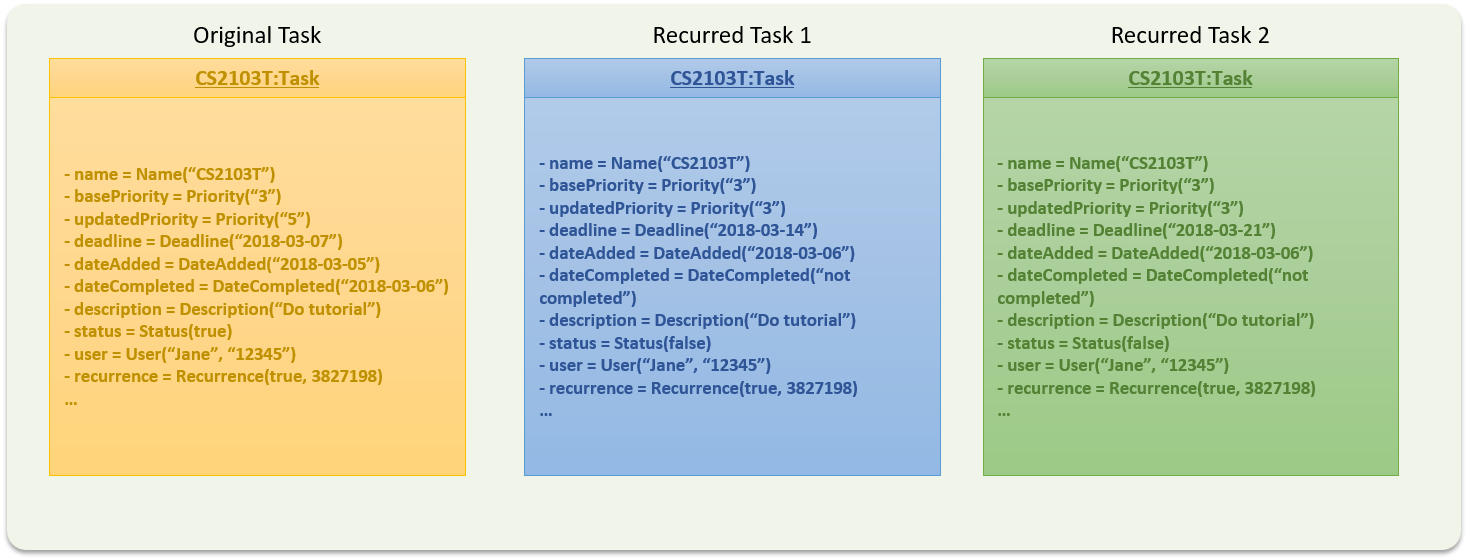
The first recurred version of the task has a deadline set to be a week after the original task’s deadline. The second recurred version of the task (if asked for by the user) has a deadline set to be 2 weeks after the original task’s deadline.
The pattern continues for the rest of the recurred versions.
The recurred versions of the tasks and all their subtasks are set to be Not Completed by default.
Additionally, the priorities of the recurred versions of the tasks are set to be the priority of the orginal task, as last set in the AddCommand or EditCommand. This is done instead of taking the priority of the original task as it is, which could have been changed by PrioriTask through its auto-updating feature.
Both RecurWeeklyCommand and DeleteRecurredTasksCommand are UndoableCommands.
The Recurrence component is implemented using a Recurrence class. The following diagram (refer to Figure 35, “Recurrence UML Class Diagram”) shows the class diagram for Recurrence.
4.5.2. Scenario
Suppose that the user wants to recur a task weekly.
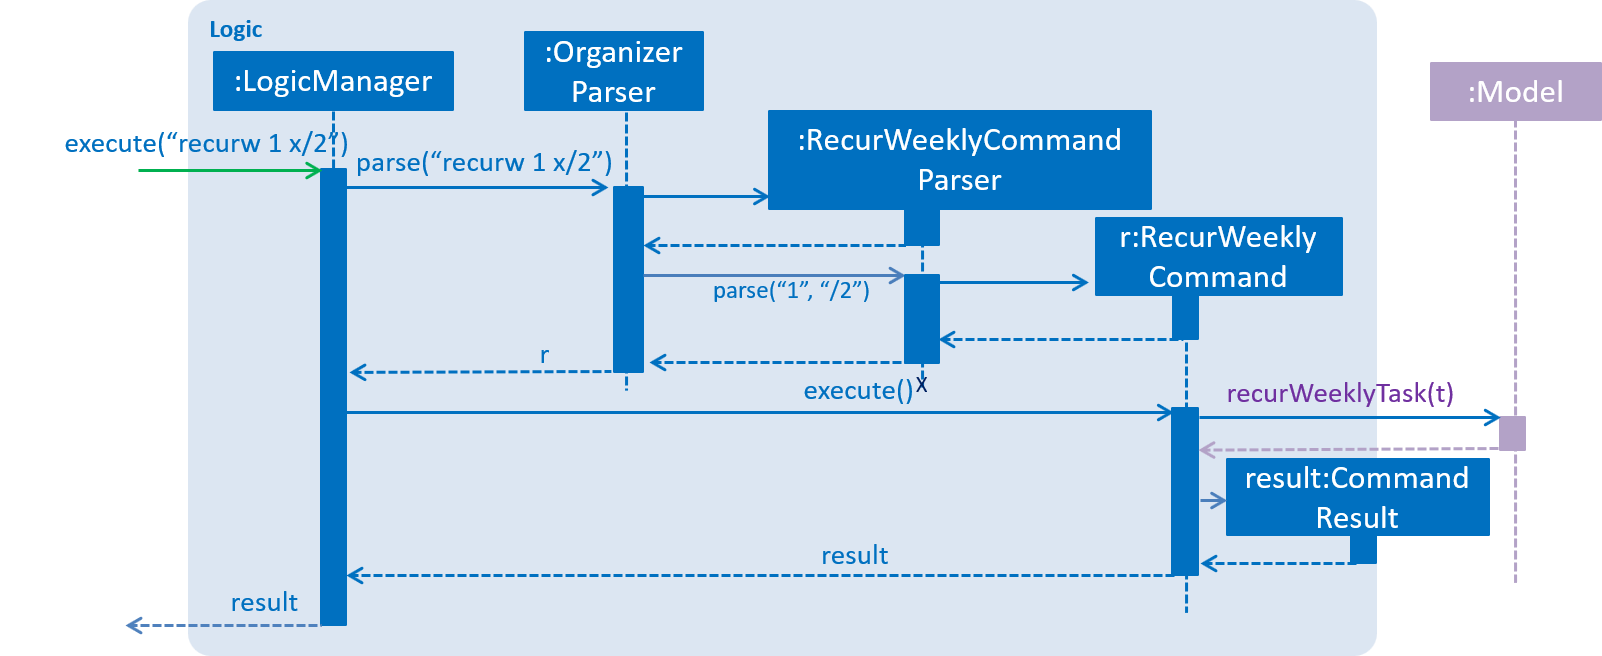
The user executes a new RecurWeeklyCommand, recurw 1 x/2, to recur the 1st task in the organizer weekly for 3 times.
Assuming that the task has not been recurred before, the following sequence diagram (refer to Figure 36, “RecurWeekly sequence diagram”) shows how the recur weekly operation works:
The object diagram below (refer to Figure 37, “Recurred tasks object diagram”) shows the original task and the 2 Tasks created after the execution of the command.
Suppose the user now wants to delete the 1st task in the PrioriTask and all its recurred versions.
The user executes a new DeleteRecurredTasksCommand, deleter 1, to delete the task that was just recurred and all its recurred versions.
4.5.3. Design Considerations
4.5.3.1. Aspect: Implementation of recurrenceGroup in Recurrence
-
Alternative 1 (current choice): Set recurrenceGroup as hash code of the task`
-
Pros: It is guaranteed to be unique, which is needed to identify a group of recurred tasks. It is also easy to implement.
-
Cons: It is not as intuitive to identify the group of recurred tasks using long hash codes.
-
-
Alternative 2: Set recurrenceGroup using a counter.
-
Pros: It is a more intuitive way of identifying recurrence groups.
-
Cons: There is a need to implement a counter for recurrence groups in
Model.
-
4.5.3.2. Aspect: Implementation of RecurWeeklyCommand
-
Alternative 1 (current choice): Add a new
Taskfor each recurred version of the original task-
Pros: It is easy to implement.
-
Cons: It takes up more memory for Objects that have very similar parameters..
-
-
Alternative 2: Maintain a list for each of the parameters that change when recurred within the original
Task, such as a list ofDateCompletedand a list ofStatus.-
Pros: It will use less memory.
-
Cons: There is a need to change how certain parameters in
Taskare implemented.
-
4.5.3.3. Aspect: Implementation of DeleteRecurredTasksCommand
-
Alternative 1 (current choice): Add tasks that are not part of the recurrence group into a new task list and set the new task list to replace the old one.
-
Pros: It only reverts changes that are hard to change back (the view can easily be re-modified as no data are * lost).
-
Cons: A user might think that undo also applies when the list is modified (undoing filtering for example), * only to realize that it does not do that, after executing
undo.
-
-
Alternative 2: Remove tasks that are part of the recurrence group while iterating through the task list.
-
Pros: This is a more intuitive way of removing tasks from the list.
-
Cons: There is a need to implement an Iterator to remove tasks, as we cannot use a for loop which can cause undefined behaviour.
-
4.6. Logging
We are using java.util.logging package for logging. The LogsCenter class is used to manage the logging levels and logging destinations.
-
The logging level can be controlled using the
logLevelsetting in the configuration file (See Section 4.7, “Configuration”). -
The
Loggerfor a class can be obtained usingLogsCenter.getLogger(Class)which will log messages according to the specified logging level. -
Currently log messages are output through the
Consoleand to a.logfile.
Logging Levels
The following are brief descriptions of different logging levels:
-
SEVERE: A message level indicating a serious failure (e.g. failure resulting in application termination). -
WARNING: A message level indicating a potential problem (e.g. application can still continue, but do so with caution). -
INFO: A message level for informational messages (e.g. noteworthy actions by the application). -
FINE: A message level providing tracing information (e.g. print the actual list of an array instead of its size).
4.7. Configuration
Certain properties of the application (e.g App name, logging level) can be controlled through the configuration file (default: config.json).
5. Documentation
Asciidoc is used for writing documentation.
| Asciidoc was chosen over Markdown as asciidoc provides more flexibility in formatting. |
5.1. Editing Documentation
See UsingGradle.adoc to learn how to render .adoc files locally to preview the end result of edits.
Alternatively, the AsciiDoc plugin for IntelliJ provides a real-time view of .adoc file edits .
5.2. Publishing Documentation
See UsingTravis.adoc to learn how to deploy GitHub Pages using Travis.
5.3. Converting Documentation to PDF format
Google Chrome can be used for converting documentation to PDF format, as Chrome’s PDF engine preserves hyperlinks used in webpages.
The following are the steps to convert the project documentation files to PDF format:
-
Follow the instructions in UsingGradle.adoc to convert the AsciiDoc files in the
docs/directory to HTML format. -
Access the generated HTML files in the
build/docsfolder, right click on them and selectOpen with→Google Chrome. -
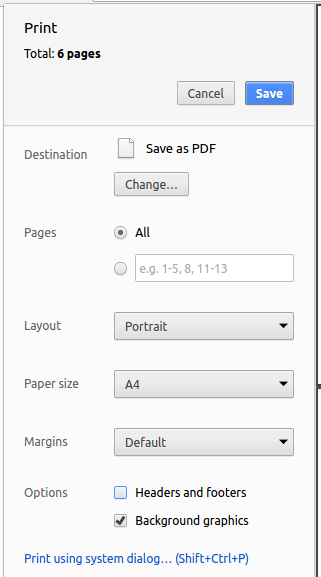
Within Chrome, click on the
Printoption in Chrome’s menu. -
Set the destination to
Save as PDF, then clickSaveto save a copy of the file in PDF format. For the best results, use the settings indicated in Figure 38, “Saving documentation as PDF files in Chrome”.
6. Testing
6.1. Running Tests
There are three ways to run tests.
| The most reliable way to run tests is the third method. The first two methods might fail some GUI tests due to platform/resolution-specific idiosyncrasies. |
Method 1: Using IntelliJ JUnit test runner
-
To run all tests, right-click on the
src/test/javafolder and chooseRun 'All Tests'. -
To run a subset of tests, right-click on a test package, test class, or a test and choose
Run 'ABC'.
Method 2: Using Gradle
Open a console and run the command gradlew clean allTests (Mac/Linux: ./gradlew clean allTests).
| See UsingGradle.adoc for more info on how to run tests using Gradle. |
Method 3: Using Gradle (headless)
Open a console and run the command gradlew clean headless allTests (Mac/Linux: ./gradlew clean headless allTests)
| Thanks to the TestFX library, GUI tests can be run in the headless mode. In the headless mode, GUI tests do not show up on the screen. This means that the developer is free to do something else while the tests are running. |
6.2. Types of Tests
There are two types of tests:
-
GUI Tests - Tests involving the GUI. They include:
-
System Tests that tests the entire application by simulating user actions on the GUI. These are found in the
systemtestspackage. -
Unit tests that test individual components. These are found in
seedu.organizer.uipackage.
-
-
Non-GUI Tests - Tests not involving the GUI. They include:
-
Unit tests targeting the lowest level methods/classes.
e.g.seedu.organizer.commons.StringUtilTest -
Integration tests that check the integration of multiple code units (these code units are assumed to be working).
e.g.seedu.organizer.storage.StorageManagerTest -
Hybrids of unit and integration tests. These tests check multiple code units as well as how they are connected together.
e.g.seedu.organizer.logic.LogicManagerTest
-
6.3. Troubleshooting Testing
Problem: HelpWindowTest fails with a NullPointerException.
-
Reason:
UserGuide.html, a dependency which should be found insrc/main/resources/docs, is missing. -
Solution: Execute Gradle task
processResources.
7. Dev Ops
7.1. Build Automation
See UsingGradle.adoc to learn how to use Gradle for build automation.
7.2. Continuous Integration
Travis CI and AppVeyor are used to perform Continuous Integration on the project. See UsingTravis.adoc and UsingAppVeyor.adoc for more details.
7.3. Coverage Reporting
Coveralls is used to track the code coverage of the project. See UsingCoveralls.adoc for more details.
7.4. Documentation Previews
When a pull request contains changes to asciidoc files, Netlify can be used to preview a HTML version of the edited asciidoc files. See UsingNetlify.adoc for more details.
7.5. Making a Release
The following are steps to create a new release:
-
Update the version number in
MainApp.java. -
Generate a JAR file using Gradle.
-
Tag the repo with the version number. e.g.
v0.1. -
Create a new release using GitHub and upload the JAR file you created.
7.6. Managing Dependencies
A project often depends on third-party libraries. For example, PrioriTask depends on the Jackson library for XML parsing. Managing these dependencies can be automated using Gradle. For example, Gradle can download the dependencies automatically, which is better than the following alternatives:
a. Including those libraries in the repo (this bloats the repo size)
b. Requiring developers to download those libraries manually (this creates extra work for developers)
Appendix A: Product Scope
Target user profile:
-
Busy university students who have many tasks to keep track of.
-
Takes many modules, is part of various student organizations, and has many activities.
-
Prefers a digital organizer over a physical organizer.
-
Requires help in monitoring numerous tasks and their levels of importance.
-
Would like assistance in task planning.
-
Is forgetful, and requires constant reminders.
-
Prefers desktop apps over other types.
-
Is reasonably comfortable with CLI apps.
-
Can type fast.
-
Prefers typing over mouse input.
Value proposition:
Help busy university students keep track of their tasks and priorities.
Feature contribution:
-
Agus Sentosa Hermawan
-
Major : Subtasks parameter
-
Allows tasks to be split into subtasks for better management.
-
-
Minor : Toggle command
-
Allows tasks to be marked as completed.
-
-
-
Dominic Kenn Lim
-
Major : User login
-
Allows multiple users to access their private tasks within the same machine.
-
-
Minor : Priority autosorting and autoupdate
-
Allows application to automatically manage task priority levels so that the user does not have to.
-
-
-
Natania Djohaari
-
Major : Recurring Tasks
-
Helps users automatically create tasks that are recurring.
-
-
Minor : Remove tags command
-
Allows users to delete multiple tags from all tasks.
-
-
-
Yeo Guek Ling
-
Major : Calendar
-
Allows users to be able to have a chronological overview of the deadlines of all their tasks.
-
-
Minor : Find deadline / description commands
-
Allows users to be search for tasks using keywords in the deadline and / or description parameters.
-
-
Appendix B: User Stories
The following is a list of user stories for PrioriTask.
Priorities: High (must have) - * * *, Medium (nice to have) - * *, Low (unlikely to have) - *
| Priority | As a … | I want to … | So that I can… |
|---|---|---|---|
|
new user |
see usage instructions |
refer to instructions when I forget how to use the application |
|
user |
add a new task |
|
|
user |
add a priority level to a task |
keep track of the priority levels of my tasks and allow the application to order tasks by priority levels |
|
user |
add a deadline to a task |
keep track of the deadlines of my tasks and allow the application to help me manage my priorities according to my deadlines |
|
user |
add a subtask to a task |
split tasks into smaller subtasks for easier management |
|
user |
add tags to a task |
organize the tasks based on groups such as modules or projects |
|
user |
add a description to a task |
give a task a description that cannot be sufficiently represented by name or subtasks |
|
user |
delete a task |
remove a task |
|
user |
delete a deadline from a task |
remove a task’s deadline when necessary |
|
user |
delete a subtask from a task |
remove a subtask I no longer need |
|
user |
delete a tag from a task |
remove a tag from a task that no longer belongs to the group |
|
user |
delete a description from a task |
remove a description that is no longer relevant |
|
user |
delete all tasks |
remove all tasks quickly |
|
user |
edit a task’s name |
update the task’s name when required |
|
user |
edit a task’s priority level |
change a task’s priority level when I need to re-organize my priorities |
|
user |
edit a task’s deadline |
change a task’s deadline |
|
user |
edit a subtask of a task |
change a subtask’s name |
|
user with many uncompleted tasks |
have all tasks constantly ordered according to their priority levels |
know the order I should complete my tasks |
|
user |
edit a task’s description |
change a task’s description |
|
user |
mark a task as complete |
complete the task |
|
user |
mark a subtask as complete |
keep track of subtasks already done |
|
user with many uncompleted tasks |
view all uncompleted tasks |
see all tasks that need to be done, along with the deadlines and priorities |
|
user |
view all details of a task |
view all details of a specified task, after seeing a list of all tasks |
|
user with many tasks |
view all completed tasks |
see all tasks that have been completed, for past reference |
|
user with many tasks |
view all tasks with a specific tag |
locate all tasks with a specific tag, without the need for a manual search |
|
user with many tasks |
view all tasks within a certain deadline |
locate all tasks within a certain deadline, without the need of a manual search |
|
user |
view a calender showing task’s deadlines |
see a chronic overview of all tasks and their deadlines |
|
user with many tasks |
find a task by name |
locate a task without the need to search through an entire list |
|
user with many tasks |
find a task by description |
locate a task when I have forgotten it’s name |
|
user who is forgetful |
have tasks' priority levels be automatically updated as deadline approaches |
be reminded to complete tasks |
|
user who is forgetful |
have tasks' priority levels be automatically increased to maximum level any are still uncompleted after the deadline has passed |
be reminded to complete tasks which are past the deadline |
|
user |
have a reminder of tasks with high priority levels |
be reminded to complete tasks with high priority levels |
|
user |
undo an operation |
revert an operation |
|
user |
redo an undo operation |
redo an undo operation |
|
user |
have a task with no priority level to have it’s priority level be automatically set to the lowest priority level |
have priority levels for all tasks even if I had forgotten to set the priority levels |
|
user |
change the view of the calendar |
choose to view the calendar by year, month, week, or day |
|
user |
reorder a task’s subtasks |
rearrange the order of a task’s subtasks when necessary |
|
user |
recover my past data |
rewrite existing data by recovering past data when necessary |
|
user using the same machine as others |
have my tasks privatized |
avoid privacy issues |
|
user using the same machine as others |
create a user account |
have an account with only my tasks accessible to me |
|
user using the same machine as others |
login to PrioriTask with my own account |
manage my own tasks |
|
user using the same machine as others |
logout of PrioriTask |
ensure privacy of my tasks |
|
user who has a user account |
retrieve my password |
login to my account if I forget my password |
|
user who has similar tasks that happen weekly |
recur tasks weekly |
easily create versions of the same task but with different deadlines. |
Appendix C: Use Cases
(For all use cases below, the System is the Organizer and the Actor is the user, unless specified otherwise)
Use case: Add task
MSS
-
User creates an account.
-
User logs into PrioriTask.
-
User requests to add a task.
-
Organizer shows the newly added task as part of a list of all tasks.
Use case ends.
Extensions
-
1a. User already exists.
-
1a1. Organizer shows an error message.
Use case resumes at step 1.
-
-
2a. User does not exist.
-
2a1. Organizer shows an error message.
Use case resumes at step 2.
-
-
3a. Invalid parameters given.
-
3a1. Organizer shows an error message.
Use case resumes at step 3.
-
Use case: Delete task
MSS
-
User logs into PrioriTask.
-
User requests to delete a task.
-
Organizer shows a list of tasks without the deleted task.
Use case ends.
Extensions
-
1a. User does not exist.
-
1a1. Organizer shows an error message.
Use case resumes at step 1.
-
-
2a. Invalid index is given.
-
2a1. Organizer shows an error message.
Use case resumes at step 2.
-
Appendix D: Non Functional Requirements
-
Should work on any mainstream OS as long as it has Java
1.8.0_60or higher installed. -
Should be able to hold up to 1000 tasks without a noticeable sluggishness in performance for typical usage.
-
A user with above average typing speed for regular English text (i.e. not code, not system admin commands) should be able to accomplish most of the tasks faster using commands than using the mouse.
-
Should come with a help feature and various helper messages so that it is usable by a novice who had only have minimal CLI experience.
-
Users are expected to know how to set up the project without an installer.
-
The end product is geared towards power users, and may not be suitable for everyone.
Appendix F: Instructions for Manual Testing
Given below are instructions to test the app manually:
| These instructions only provide a starting point for testers to work on; testers are expected to do more exploratory testing. |
F.1. Launch and Shutdown
-
Initial launch
-
Download the jar file and copy into an empty folder.
-
Double-click the jar file.
Expected: Shows the GUI with an empty task list. The window size may not be optimum.
-
-
Saving window preferences
-
Resize the window to an optimum size. Move the window to a different location. Close the window.
-
Re-launch the app by double-clicking the jar file.
Expected: The most recent window size and location is retained.
-
| If the window size is smaller than the default height and width, the window size will be reset to default upon app re-launch. |
F.2. User Management
-
Signing up
-
Prerequisites: Application is not currently logged in.
-
Test case:
signup u/dave p/dave
Expected: No user account is created. Error details shown in the status message. Status bar remains the same. -
Test case:
signup u/admin p/admin
Expected: A user account is created. Username of the created user account is shown in the status message. Timestamp in the status bar is updated.
-
-
Logging in
-
Prerequisites: User account with username 'admin' and password 'admin' has been created.
-
Test case:
login u/admin123 p/admin123
Expected: Login attempt fails. Error details shown in the status message. Status bar remains the same. -
Test case:
login u/dave p/dave
Expected: Login attempt fails. Error details shown in the status message. Status bar remains the same. -
Test case:
login u/admin p/admin
Expected: Login attempt is successful. Username of currently logged in user is shown in the status message. Timestamp in the status bar is updated. Currently logged in user in status bar is updated.
-
-
Adding a question answer set
-
Prerequisites: Application is currently logged in.
-
Test case:
addqa q/ a/
Expected: No question answer set is added. Error details shown in the status message. Status bar remains the same. -
Test case:
addqa q/are cats cool? a/yes
Expected: Question answer set is added. Username of the currently logged in user and the command success is shown in the status message. Timestamp in the status bar is updated.
-
-
Retrieving a question for password retrieval
-
Prerequisites: Application is not currently logged in. User account with username 'admin' and password 'admin' has been created. UserQuestion answer set has been added to user : 'admin'.
-
Test case:
forgotpassword u/admin123
Expected: Question retrieval fails. Error details shown in the status message. Status bar remains the same. -
Test case:
forgotpassword u/admin
Expected: Question retrieval successful. Question of 'admin` shown in the status message. Status bar reminas the same.
-
-
Answering a question for password retrieval
-
Prerequisites: Application is not currently logged in. User account with username 'admin' and password 'admin' has been created. UserQuestion answer set with answer 'yes' has been added to user : 'admin'.
-
Test case:
answer u/admin123 a/yes
Expected: Password retrieval fails. Error details shown in the status message. Status bar remains the same. -
Test case:
answer u/admin a/no
Expected: Password retrieval fails. Error details shown in the status message. Status bar remains the same. -
Test case:
answer u/admin a/yes
Expected: Password retrieval successful. Password of 'admin' shown in the status message. Status bar remains the same.
-
F.3. Task Management
-
Recurring a task weekly
-
Prerequisites: Application is logged in, and at least a task is added that has not been recurred yet.
-
Test case: recurw 1 x/2
Expected: Task recurred successfully. A success message will be shown in the results display box. 2 tasks will have been added to the task list panel and the calendar.
-
-
Deleting a task and its recurred versions
-
Prerequisites: Application is logged in, and at least a task is added that has been recurred.
-
Test case: deleter 1
Expected: Task and its recurred versions deleted successfully. A success message will be shown in the results display box. The task and its recurred versions will not be shown in the task list panel or the calendar.
-
-
Adding a subtask
-
Prerequisites: Application is logged in, and at least a task is added with no subtask.
-
Test case: adds 1 n/Prepare Project Report
Expected: Subtask added successfully. A success message will be shown in the results display box, and subtask with namePrepare Project Reportappears on the first subtask.
-
-
Editing a subtask
-
Prerequisites: Application is logged in, and a task is added with a subtask.
-
Test case: edits 1 1 n/Prepare Project Report
Expected: Subtask edited successfully. A success message will be shown in the results display box, and subtask with namePrepare Project Reportappears on the first subtask.
-
-
Deleting a subtask
-
Prerequisites: Application is logged in, and a task is added with a subtask.
-
Test case: delete-subtask 1 1 n/Prepare Project Report
Expected: Subtask deleted successfully. A success message will be shown in the results display box, and the task will have no subtask.
-
-
Toggling a subtask
-
Prerequisites: Application is logged in, and a task is added with a subtask.
-
Test case: toggle-subtask 1 1
Expected: Subtask toggled successfully. A success message will be shown in the results display box, and the subtask status will be changed.
-
F.4. Calendar
-
Adding a task
-
Prerequisites: Application is logged in.
-
Test case:
add n/CS2101 OP1 d/2018-03-23
Expected: Task added successfully. A success message will be shown in the results display box. Task is reflected on the calendar on the2018-03-23date.
-
-
Editing a task
-
Prerequisites: Application is logged in. At least one task is present in the organizer.
-
Test case:
edit 1 n/Prepare for OP1
Expected: Task updated successfully. A success message will be shown in the results display box. Calendar will be updated with the task’s new name. -
Test case:
edit 1 p/3
Expected: Task updated successfully. A success message will be shown in the results display box. No changes will be made on the calendar because the task’s name and deadline was not changed.
-
-
Deleting a task
-
Prerequisites: Application is logged in. At least one task is present in the organizer.
-
Test case:
delete 1
Expected: Task deleted successfully. A success message will be shown in the results display box. Calendar will remove the deleted task.
-
-
Switching between months
-
Prerequisites: Application is logged in.
-
Test case:
pmonth
Expected: Calendar view changed successfully. A success message will be shown in the results display box. If the currently viewed month on the application isApril 2018, calendar will showMarch 2018after execution of command. -
Test case:
nmonth
Expected: Calendar view changed successfully. A success message will be shown in the results display box. If the currently viewed month on the application isApril 2018, calendar will showMay 2018after execution of command. -
Test case:
cmonth
Expected: Calendar view changed successfully. A success message will be shown in the results display box. If the currently viewed month on the application isDecember 2018and current month isApril 2018, calendar will showApril 2018after execution of command.
-